Difference between revisions of "Basic NPC Creation Tutorial"
imported>DragoonWraith |
imported>Nicwilliams2143 (Added video form) |
||
| Line 73: | Line 73: | ||
From the [[Object Window]], navigate to Magic>LeveledSpell, and drag the ''LL1AlterationMinorLvl100'' spell list into the NPC. This will prepare her for battle with some alteration spells appropriate for the level of the player. | From the [[Object Window]], navigate to Magic>LeveledSpell, and drag the ''LL1AlterationMinorLvl100'' spell list into the NPC. This will prepare her for battle with some alteration spells appropriate for the level of the player. | ||
Video form: | |||
http://www.youtube.com/watch?v=L-0XkRHwZRc | |||
==Basic AI & Package Editing== | ==Basic AI & Package Editing== | ||
Revision as of 01:53, 12 December 2010
This article is a Featured Article. This means that it has been found to be among the best articles on the Wiki, and that it may serve as an excellent example of what articles should strive for.
This tutorial will cover the basics of creating a new NPC combatant and placing it in a dungeon. The following subjects will be covered.
- Creating a new NPC
- Editing NPC Stats
- Editing NPC Appearance
- Editing NPC Inventory & Spells
- Basic AI & Package Editing
This tutorial will not delve into dialogue or quest creation. Let's begin.
Creating a new NPC
For this tutorial, let's create a special boss NPC for Creepy Cave tutorial dungeon. As such, load up the cell CreepyCave02 we created and delete "LL1BanditBossLvl100".
If you didn't complete the tutorial; don't worry, the dungeon from the tutorial just happens to have a boss chamber we're re-using.
It's often useful to use existing NPCs as templates when creating new ones. For this example, let's look in our Object Window under NPCs and select "BanditBossFemale1". Double click the entry to open her properties tab.
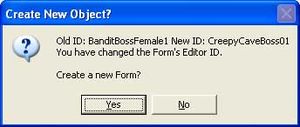
Important: Before doing anything, change her ID to something unique. This way we avoid accidentally saving our changes to the existing NPC. When you hit 'OK' after changing the ID, you'll be prompted to either rename the existing object or create a new one. Select 'Yes' to create a new Form. If you select 'No' at this prompt, you will overwrite the existing NPC, rather than create your own unique version - meaning all the changes you apply here will be applied to the original, in-game NPC.
Editing NPC Stats
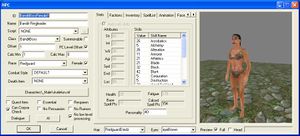
Let's briefly review the basic properties on the far left of this window.
- ID Editor ID for this NPC. Must be unique. Let's use CreepyCaveBoss
- Name NPC name as it will appear in-game. We can leave this alone.
- Script Scripts can be attached to NPCs here. Leave it blank for this one.
- Class BanditBoss is a special class. To view the details of pre-made classes, navigate to Character>Class... in your toolbar
- Summonable Leave blank!
- Offset/PC Level Offset Checking this box will cause the NPC's stats to adjust to the player's level. Offset determines how much above or below the player's level the NPC will be. In this case, our NPC will be one level higher than the player. That's fine for now; it can be tweaked later.
- Calc Min/Max These check boxes determine minimum and maximum levels for the NPC. This is useful for creating semi-leveled content. For instance; we could create a dungeon which levels to players between levels 10-15 using these boxes. In this case we'll leave the default settings at 1 and 0, meaning the NPC will level to any player.
- Race Straightforward - choose a race from the drop-down menu. Choose any race you like, but I'm opting for a Dark Elf.
- Female Even more straightforward. We'll keep this boss female in the name of equal-opportunity slaughter.
- Combat Style Combat styles influence NPC choices during a fight. For what we want this NPC to do, the default style will be just fine.
- Death Item Used for special loot items that we don't want to show up until after an NPC is dead. This is useful for items we don't want pick-pocketed and biological items (i.e. it's not feasible to remove an NPC's heart until said NPC has otherwise ceased to live)
- Essential Used for special NPCs and usually controlled via script. Essential NPCs cannot be killed and are only knocked unconscious.
- Respawn This NPC will respawn when the cell reloads if you check this - since this is an unnamed boss, we want to allow respawns.
You may notice that the values in the Stats Tab are locked. (except for personality) This is because we have "PC Level Offset" checked.
The Factions Tab is also important. We'll leave the "BanditFaction" in here, but if we needed to add any, we could do so from Character>Factions... in the toolbar. Then drag the faction from the list on the left into the list of factions for the NPC. Additionally, you may set the faction rank simply by clicking once on the faction rank number in the NPC window, and typing in a new value.
Editing NPC Appearance
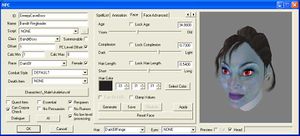
Click the Face Tab. This tab gives us some basic controls in the form of age, complexion, and hair sliders. Additionally we can change hair style, color, generate random facial features, and change eye color.
The "Lock" radio buttons allow you to manually set sliders and then use the "'generate" button to randomize all other features of the face.
A note on hair color: Very brightly colored hair can be tempting, but it generally does not fit well with the fantasy setting of Oblivion and breaks the player suspension of disbelief. Resist the temptation! Try this technique for creating new hair colors:
- Press Select Color
- Choose a bright color you like
- On the right, notice a vertical bar with a sliding arrow.
- Slide the arrow to almost-black
- press OK to preview results
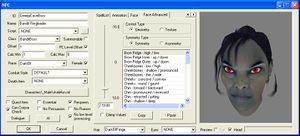
Usually it's enough to randomly generate a unique face and move on, especially for combatants like this boss NPC. For more delicate tuning, however, we can select the Face Advanced Tab.
This tab opens myriad options and is even more robust than the in-game facial editing features. We'll go over the basics here, but you'll learn the most by experimenting with the options available on your own.
- Slider This slider will be used to edit the features you select.
- Control Type Geometry mode will allow you to change the actual shape of the NPC facial structure, while texture will allow you to change the appearance of skin, facial hair, and cosmetics. For this NPC I lowered her brows, making her look a bit meaner than the random face I had generated.
- Symmetry Type Usually you'll want to work in Symmetry mode. However; Asymmetry mode (only available for geometry control) is very useful for creating interesting imperfections in character faces. For instance, I've changed the Mouth - corners transverse shift on this NPC to -8.93, giving her the appearance of a smirk. Just remember that it's best to be subtle, though when creating a combat-only NPC such as this, you can go a little bigger than you would with a speaking NPC.
- Mouse Editing You can use the right mouse button in the render window to make manual adjustments to the facial geometry.
Editing NPC Inventory & Spells
Open the Inventory Tab. You can do this by using the small left/right arrow icons. You'll notice a lot of items beginning with LL in this list. This is the standard prefix for Leveled lists used when we created the game. Since we used a template NPC we don't need to add anything to this - her inventory contains all the equipment she needs to provide the player with a challenging battle and rewarding spoils. However; if you wanted this NPC to carry a special item (notes and keys are especially good examples), you would drag the item into this list from the Object Window.
Notice also that you can enter a hypothetical player level and press Preview Calculated Result. This will open a pop-up window with a list of items that the editor chooses randomly from the list. Running this test a few times is a good way to test your inventory without having to run the game.
Next, open the SpellList tab. This list is empty, but let's give this boss some basic alteration ability, since she's got a little skill in that school of magic (I determined this from the stats tab).
From the Object Window, navigate to Magic>LeveledSpell, and drag the LL1AlterationMinorLvl100 spell list into the NPC. This will prepare her for battle with some alteration spells appropriate for the level of the player.
Video form: http://www.youtube.com/watch?v=L-0XkRHwZRc
Basic AI & Package Editing
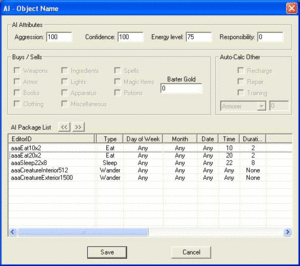
Finally, we want to give this NPC a little more than the standard behavior. Press the AI Button to open the AI window.
We're only concerned with the AI Attributes and AI Package List portions of this window. The other settings are for vendor and trainer NPCs.
We can leave the default AI Attributes from the original NPC we opened. Aggression and confidence of 100 mean she will engage any enemy and never run away. You can play with these values to get different behavior, such as lowering confidence to give the NPC a tendency to flee from battle. Energy level and Responsibility tie into some other AI behaviors and can be left alone for this NPC.
Notice aaaCreatureInterior512 and aaaCreatureExterior1500 packages already in the package list. aaa is a naming convention prefix we use to indicate basic packages which can be used on any NPC or creature. We'll leave these two in, which will just allow the NPC to wander around and interact with the environment if no other packages are chosen.
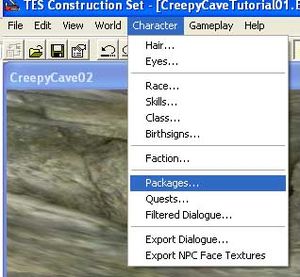
In your toolbar, open Packages.... This is a complete list of packages created. Select the following three and add them to the NPC's package list.
- aaaEat10x2
- aaaEat20x2
- aaaSleep22x8
These are all standard packages we can use, as indicated by the aaa prefix. The naming convention for these three also give time information. The first number is a time in military time, and the second is a duration. So our NPC will now Eat for two hours at 10am and 8pm, and sleep for eight hours at 10pm. This behavior will create a chance that some players may be able to more easily sneak in and loot her and her living area without direct confrontation.
AI processes the package list from top to bottom, so be sure to keep the wander packages at the bottom. Because they have no conditions (such as time or duration), the AI will always choose one of them, meaning that the NPC will never eat or sleep if those packages are below either of the wander packages in the list.
Saving and Testing
Again, be sure to have changed the ID before pressing okay, otherwise you'll overwrite the changes of the pre-existing NPC we used as our template.
Now you're ready to drag the NPC into her chamber in CreepyCave02 (or any place you prefer). It's a good idea to keep her near the bed for her sleep package, and you may want to put extra food in the room for her.
You can also add food to her inventory and set the quantity to -1, meaning she'll never run out of food. This is helpful when NPC's searching for food in the environment begin to cause bad behavior.
That's about it! You can save this plugin and test it as normal. Now you have a special boss just for your dungeon, and can tweak any of the settings we learned about to tailor your player experience.
