Generate High resolution LOD textures
Overview[edit | edit source]
In the Construction Set, you can automatically generate LOD textures; however, those textures are very low quality and are therefore not very useful or nice to look at.
The method that is described below uses the CS to generate local maps and then stitch together those local maps into cohesive LOD textures. Because local maps cover a much smaller area than LOD textures, stitching together many local maps results in a much more detailed LOD texture than those that can be generated by CS alone.
Generate Local Maps[edit | edit source]
Activate your mod in the Construction Set and load one of the exterior locations related to your mod in the render window. Press Shift+C to make only landscape visible(*).
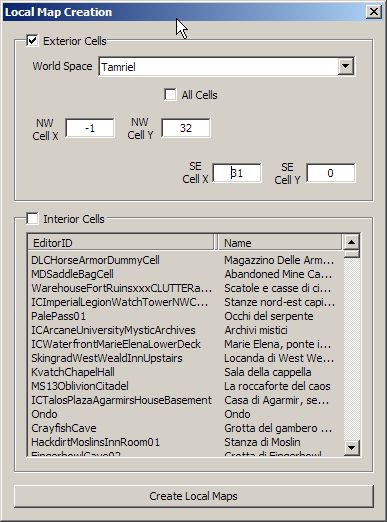
In the CS menu, go to World --> "Create Local Maps." Choose the exterior world space that corresponds to your mod. If your mod modifies the appearance of the Tamriel world space, just choose "Tamriel." Selecting "All cells" will generate maps for the entire world space, which is very memory intensive and will cause CS to crash if you do not have enough memory.
If this becomes the case, you will need to split the work into one LOD at a time.
In the "Create Local Maps" window, use the NW Cell, Cell coordinates to define the area you want to be generated.
Of course, for a single LOD the coordinates you need to supply are:
If you need the 60.XX.YY.32.dds LOD
NW CELL : XX,YY+31 SE CELL : XX+31,YY
For proper alignment, the python script needs an additional row and column, so :
NW CELL : XX-1,YY+32 SE CELL : XX+31,YY
By splitting the generation into smaller parts CS won't crash.
Here are the settings for the IC Quad LOD (60.00.00.32.dds)
Once you have finished the process, check your [Oblivion path]\textures\maps folder to make sure that all files have been correctly generated.
Prepare the Working Directory[edit | edit source]
1. Create a folder named C:\obwrk
2. Create a 256x256 black .tga picture and save it as Base.tga in C:\obwrk
3. In c:\obwrk, create a batch file named basegen.bat and insert this code:
for /L %%a in (-65,1,63) do for /L %%b in (-64,1,64) do copy /b .\base.tga .\"Tamriel."%%a"."%%b".tga"
for /L %%a in (-65,1,63) do for /L %%b in (0,1,9) do move /y .\"Tamriel."%%a"."%%b".tga" .\"Tamriel."%%a".0"%%b".tga"
for /L %%a in (0,1,9) do for /L %%b in (-64,1,64) do move /y .\"Tamriel."%%a"."%%b".tga" .\"Tamriel.0"%%a"."%%b".tga"
for /L %%a in (0,1,9) do for /L %%b in (0,1,9) do move /y .\"Tamriel.0"%%a"."%%b".tga" .\"Tamriel.0"%%a".0"%%b".tga"
for /L %%a in (0,1,9) do for /L %%b in (0,1,9) do move /y .\"Tamriel."%%a".0"%%b".tga" .\"Tamriel.0"%%a".0"%%b".tga"
Double click the .bat. This will make thousands of copies of base.tga, generating lots of Tamriel.xx.yy.tga files. This is because CS does not always generate all the maps (i.e. boundary is not exactly stopping at multiple of 32 cells) and having a file in place for every single map will be necessary for one of our below steps.
Assemble the Local Maps[edit | edit source]
At this point you can follow Ghanburighan's procedure LOD texture fix script with the following changes:
1. First download the files in the "What you Need" heading of Ghanburghan's procedure
2. Then start at point number four under "Walkthrough," except you will want to point the input folder of the .dds converter to the place where the local maps were stored (Oblivion\Data\textures\maps\*Mod name*). The output folder should remain at C:\obwrk, which will overwrite some of the blank .tga's we just produced.
3. When you get to step 5 where you use Python, use the code below instead of the code provided by Ghanburghan:
import os, Image, ImageOps

WRKDIR = 'c:/obwrk'

BLX = raw_input('Enter this quads lower left cell x coordinate ')
BLY = raw_input('Enter this quads lower left cell y coordinate ')


BLX = int(BLX)
BLY = int(BLY)
TRX = BLX+32
TRY = BLY+32

BL = (BLX,BLY)
TR = (TRX,TRY)
TILESIZE = 241


os.chdir(WRKDIR)

outim = Image.new('RGB', (7712, 7712))
xoffset = -234
yoffset = 7464
xrange = range(BL[0]-1,TR[0], 1)
yrange = range(TR[1], BL[1]-1, -1)
yrange.reverse()
for x in xrange:
    for y in yrange:
        print "tamriel.%02d.%02d.tga (%d,%d)" % ( x, y, xoffset, yoffset)
        inim = Image.open("tamriel.%02d.%02d.tga" % (x,y))
        outim.paste(inim, (xoffset, yoffset))
        yoffset -= TILESIZE
    xoffset += TILESIZE
    yoffset = 7464
outim = ImageOps.flip(outim)
outim.save("60.%02d.%02d.32.png" % (BLX, BLY))
At the prompt, type the coordinates of the LOD you want to be generated. Example: Coordinates 0,32 for 60.00.32.32.dds. (The x coordinate is the middle left number while the y coordinate is the middle right number of the produced LOD texture)
This will generate a full 7712x7712 resolution LOD which you can decrease in size to 4096x4096 or 2048x2048 and save as .dds
Notes[edit | edit source]
(*) Everything that you set as visible in the render window before generating the local maps will be put into the maps. By pressing shift+C you will obtain textures like Zacharot "no rocks," which contain no buildings. If you want full control on what is visible you will have generate custom Oblivion base BSA's and put put only what you want to see into those BSA's.
- CS will generate maps only for the walkable area, everything outside it will appear flat green or corrupted, even if it's a part of the map clearly visible from walkable area. My suggestion is to retrieve this missing parts of map from Vanilla LODs textures and, after properly resizing it, cut and paste into the new generated textures.
