Difference between revisions of "Blender/Creature Meshes 101"
imported>Fragment m |
imported>Fragment |
||
| Line 465: | Line 465: | ||
Relieved? Good. | Relieved? Good. | ||
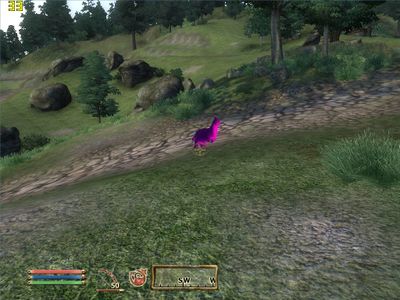
[[image:tutcre101-scrn-inoblivion.jpg| | [[image:tutcre101-scrn-inoblivion.jpg|400px]] | ||
== Additional NIFskope work: collision boxes == | == Additional NIFskope work: collision boxes == | ||
Revision as of 09:31, 20 August 2006
| DO NOT EDIT OR DELETE THIS PAGE JUST YET, I'M KEEPING THE SOURCE AT HOME IN MY EDITOR FOR NOW! |
Place comments/questions/bugs on the discussion page, please.
What we plan to achieve is to get this model into Oblivion, as a creature, which behaves and moves in certain ways. We use Blender and a number of other free tools to that end.
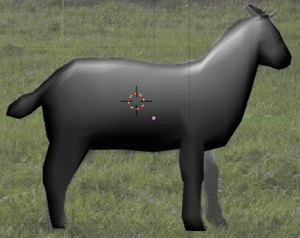
I of course threw the model together in one and a half hour, and it shows. You'll learn how to get your own, much improved model into Oblivion in this tutorial.
Notation:
- List items like this are actions to follow.
Italics define a goal of some sort.
When I write something in bold, I mean it. Really.
The Blurb, or preface
While I still played Oblivion, I always wished for more creatures, more simple animal live for Oblivion, because, you see, the bears and slaughterfish and eight other animals don't seem to be quite enough to fill a world this large.
So I started out to follow CuteUnits call for more sealife, and tried to educate myself on the creation of new creatures for Oblivion. About 60 hours later, and endless gnawing on the tools, and howling with frustration, and much gnashing of teeth, and pestering people on the forum, I managed to get my first model into the game.
| HINT NO 1
Always try the whole process on the rough version of your model as early as you can. See if you can do it at all. You may hit a wall later, and it's going to suck to come up empty-handed after you spent tens of hours on the model. |
While I learned as much in such a short time as I haven't for years, I would rather have had a simple "click here, then there"-style-guide to follow, to get me started. This guide is meant as such a guide, designed to help you getting started.
Be warned though on two accounts, first: Learning all this is not easy, there are seldomly quick successes to be had. You need to take your time, play with things. Second: When you continue to explore the guts of NIF and meshes and materials, there's much trouble on your way. You need to be persistent. No tutorial can teach you this.
I'm of course standing on the shoulders of giants. Few things you find in here are actually my own.
That said, let's delve right in.
Preparations
Delve right in? Not so fast. There are a few programs you need to download, and the data we're going to mod has to be unpacked. Oh, and there is a rather complex and large program you need to learn.
Required: Basics
You need to know how to deal with .zip files, how to work in Windows Explorer (e.g. how to navigate to a folder and look at the contents), how to install and run programs, how to use a search engine and the search function on forums.
If such things are beyond you, you're so wrong here.
Required: Tools
Download and install all of these.
- Blender
- Blender NIF export scripts
- From the same page, NIFskope itself
For BSA unpacking, you also need a tool capable of that (see below), and for texture work you want an image editing program which is capable of saving DDS files. If you don't have Photoshop, use The Gimp and the associated DDS export plugin. Otherwise, just get the Photoshop plugin from NVidia.
Oh, and don't make it a habit to just click on any link you're seeing. That can be dangerous.
Required: Unpack your BSA
We need to unpack the original files first so we can mod them. The original files come in a special archive format called BSA. Imagine it as a giant ZIP archive, only it hasn't been packed with ZIP, but with another tool.
- to unpack, please peruse the BSA Unpacker Tutorial on this wiki
Because I'm german and because I used BSA commander, my unpacked BSA files go in c:\programme\bsacmd\out. Yours will be somewhere else, if you followed the tutorial, c:\BSA. I'll refer to that folder under the name of "unpacked BSA folder" below.
Required: Learn Blender
| HINTS
As any very complex program, Blender cannot be learned by just exploration. You need to read the manual. Really, now. Go. I'll be waiting here for you. The german version is quite a bit better organized. If you understand german better than english, use that. |
You need to learn the basics of the modeller we use first. The documentation is as free as the program, and you will have to spend a few hours learning to move in Blender, to select and move things, to edit a mesh. You need to understand a few words, for example vertex, mesh, object. To that end, doing a tutorial will get you started nicely.
This is the newbie documentation for blender.
Follow the tutorial, and I mean, follow it, using Blender and the mouse and the keyboard, up to, and including, the Quickie Model section. You should be good to go from there. You'll need to read up on other sections later, though. And try to remember that there's a section devoted to splitting windows. I'll test you later!
Finding and preparing an existing creature to mod
| HINTS
Do not choose a model with shape-key-animations. You can recognize these in NIFskope when an animation plays when you hit the play button. They also have a special node called NiGeomMorpherTransformer. Stay the hell away from creatures with these. |
One of the limitations of the process described here is that we (read: I) cannot yet edit the animations of the creatures we make. The only thing we can do is to replace the "skin" of existing creatures to be our own. We have to live with the existing animations, although we will be able to "blend out" certain parts of them.
We thus have to find a model which already somewhat fits our idea of the new creature, especially which already moves in the right way. Let's have a look.
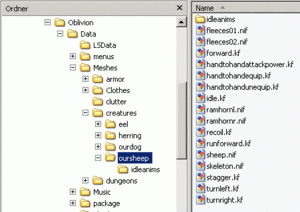
- Open the unpacked BSA folder we created earlier. From there go to meshes, then creatures. Open the sheep folder.
- In there double-click skeleton.nif. Left-click and drag in the window with the green lines (render view), and the model should rotate. What you see here is the "skeleton" of the creature, made up of individual bones.
- If you select Render>Draw Havok, you'll also see the collision boxes (or ellipsoids), rendered in a darker shade of green.
- Close NIFskope. Double-click sheep.nif, rotate this a bit. That's the model of the creature.
What we're going to achieve is to replace the model of this with our own. We make ourselves at home in the Oblivion\Data folder by copying the sheep folder there under a different name.
- Now copy the whole sheep folder to Oblivion\Data\meshes\creatures. You may need to create the meshes\creatures folders in your Data folder first.
- Since we do not wish to replace the sheep coming with Oblivion, we rename the sheep folder to "oursheep".
- Make a backup copy of the .nif files right now. That's not strictly neccessary, but convenient. Just select them, hit Ctrl-C, Ctrl-V. Should you want to start anew with a fresh skeleton.nif or so, it will be right there.
That's the folder we're going to work with. In there are the files we're going to mod!
Creating a clean skeleton
We later need to "rig" the new mesh to the skeleton, but Blender cannot yet import it in the form as it is here. So while we're there, we right now create a skeleton.nif suitable for importing into Blender.
- Double-click skeleton.nif. NIFskope opens with the skeleton file.
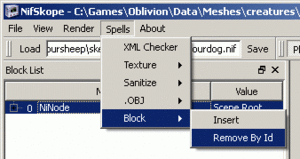
- In the menu, select Spells>Block>Remove by ID
- In the text field, enter ^BS|^NiBS|^bhk|^hk|^NiTransform (just add the last part)
- Click OK
- In the Block List Window, select the "Root Node", "0 NiNode Scene Root"
- leave NIFskope open
We actually just deleted all havok data. Oops! But as we're not going to use any of it directly in the game later, it will be OK. The problem is, Blender will not be happy with just the naked bones - there must be a skin they're attached to.
So, what we need to do now is to copy the relevant skin mesh into the .nif. .nif files store the bare meshes as NiTriShape or NiStripShape. We find that mesh, and then copy the required mesh into the cleaned skeleton.
- in NIFskope, chose File>New Window
- in the new window, click Load, load the sheep.nif
- open the 0 NiNode in the Block List by clicking the "+" besides it
- in there is a NiTriShape (other models have NiStripShapes)
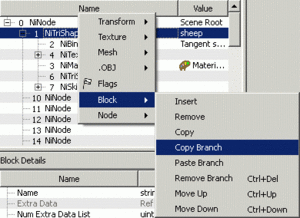
- right click them, click Block>Copy Branch
- in the window with the skeleton.nif, right click "0 NiNode Scene Root", select Block>Paste Branch
- in front of the new node is a number, remember that, for me, today, it's 90
| HINTS
A collection of things, an "array" in NIFskope is made of a number of the items listed, and a list of the items ID themselves. Above the "Children" property there's a property named "NumChildren". Since we have only one NiTriShape, we don't need to change that. Had we two or three of them, we'd have increased that number accordingly, and right clicked on the children node and said Array>Update there. Other arrays work alike thoughout NIFskope. |
The next step is to make the mesh a children of the "0 NiNode SceneRoot" node. We have the mesh outside the Scene Root tree and now want to put it inside. To achieve that:
- select the scene root node
- make sure you see the "Block Details" window. Hit F2 if you do not.
- scroll down, you should see "NumChildren" and "Children" directly below
- double-click the value in NumChildren, increase by 1 (=by the number of meshes we added)
- right click on the "Children", chose Array>Update
- open it (+)
- double-click "None" and replace with the number you remembered above, it was 90 for me.
When you hit Enter, the copied mesh wandered into the scene root node! And the sheep mesh is now correctly positioned on the skeleton.
Finally:
- save the file as cleanskel.nif
| DEBUGGING
When Blender loops endlessly upon importing, the mesh in the .nif is broken. It can be fixed by exporting as .obj and reimporting it. I sincerely hope that doesn't happen to anyone else. |
Phew! That was quite some work, to make a cleaned skeleton like this. But the good news is, you only need to do that once for each creature. You can reuse the cleaned skeleton for other creatures which are based on the same skeleton.
Did I mention we're going to just delete the mesh as soon as we're importing it? Damn, so much work.
So, let's switch tools, to Blender.
Blender work
| DEBUGGING
Your surface normals must point in the right direction, or weirdness will ensue. If you have darker surfaces in the shaded view in Blender, they're not "normal". If you have a closed model, that's pretty simple to fix: SPACE, Edit>Normals>Recalculate outside. I do that quite often on the slightest suspicion that something is wrong. Blender will get it wrong once in a while when you start to place vertices by hand and fill the polygons in by hand. But, that's easy to fix. Make sure you don't have double vertices (SPACE, Edit>Vertices>Remove Doubles). Also make sure you didn't accidentially put lines through or vertices inside into in your model. If normalization does not appear to do what it should, that's usually the problem: Your model is not continuous. You have doubled vertices or open-ended surfaces. |
So, what do we want here? As you've been told above, you needed to learn to move around in Blender. We're going to use that new skill of yours to attach the skin to the bones. A second goal is to "paint" the sheep with a texture.
For the future: You will need to do any of the following steps multiple times, in an iterative fashion. For example, the animation is dependant on the polys, as animations just move polys. You may later find that you have too few of them in certain places which bend a lot. That means you need to increase the polycount, by making new cuts, loop-cutting, subdividing and simple vertex moving. But changing vertices will destroy your UV-mapping, so that needs to be redone. It pays to double- and triple- and quadruple-check your model before dealing with the texture. And it very much pays to get the animation right before texturing.
For the model we want to import into Oblivion there are some requirements.
The model needs to roughly fit the existing ones. Look for example at the dog model, the original has a raised head and the tail in a straight line. You can just about forget to start with a dog sitting, its tail wound around the paws. If you have a model with a wrong tail, well a tail is quickly deleted and redone, but much more problems than that and I would rather start anew. You can play around with the overall size in the construction set later, or leave parts of the rigging out. If you want to have a small dog, just set size to 0.5 later. If you want to have a dog with a capped tail, just don't rig the last tail bones.
To keep everything as simple as possible, use one material only. When you use more than one material (or material index), you will get multiple meshes in the NIF you export. That's good later if you plan to have multiple textures on one mesh, but we're not trying fancy stuff like that right now.
Another possible requirement is - that is based on my bad experience only, I might be totally wrong - that the model needs to be a continuous flow of polygons. Don't have holes in it, don't have open edges. Every edge of the model needs to connect to another one.
Skinning the model
Enough blah blah.
- open Blender
- load the goat model
- switch to wireframe view (ZKEY)
- in the menu, File>Import>NetImmerse/Gamebryo
- chose cleanskel.nif
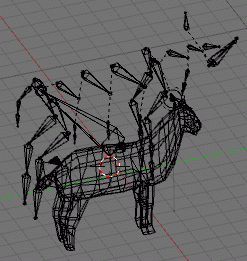
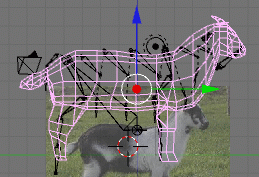
You now see the same structures you earlier saw in NIFskope, in Blender. In the front is the sheep mesh, inside - look closely - you can see the skeleton. We want to rig that skeleton to our mesh. Study the Bethesda model for a moment, how they did things. Then, in Object Mode, right click the sheep mesh and delete it (XKEY). That hurt, right? What you have left is the basic skeleton.
- scale and move and rotate the sheep model into a good position. Rotate by exact amounts (hold CTRL). Do not change the skeleton in any way! That will not do what you think it does.
- hit Ctrl-A to apply the scale and position changes
- save your work using F2, NUMPAD+, ENTER (that adds a version number)
- right click the goat mesh, shift-right click the skeleton, hit ctrl-P, select armature, select don't create vertex groups
We just parented the mesh to the skeleton. That means if you move the skeleton, the mesh moves along with it - a good start! But what we actually need is not only a movement of the mesh along with the skeleton, but a deformation of the mesh itself. To that end, we must tell which vertices belong to which bone(s). That process is called weight painting. The deformation does not use absolute yes-or-no values, but a value between 0 and 1 (or 0% and 100%), it's "weighted". The value determines how much a vertex is influenced, not only if it's influenced at all. Of course a value of 0 means it's not influenced at all.
Why it's called painting, you shall soon see with your own eyes:
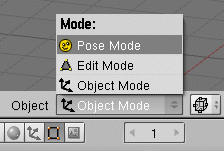
- right click the skeleton, select pose mode
- right click the mesh, select weight paint mode
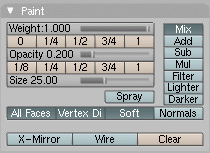
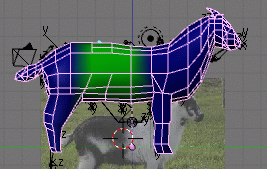
The model turned all blue now, and you have the new "Paint" panel in the buttons view. Let's take a quick look at that panel.
(1) is a slider, below are 5 buttons to set the sliders value directly. As you probably have guessed all on your own, it's the weight we would assign to a vertex.
(2) sets opacity. Set this to 1, we don't really need the amount of control this offers.
(3) is the size. You may need to make this smaller when you paint tricky things.
(4) wire turns on the wireframe model. Turn on or off as you like.
Let's start painting. Don't become too obsessed with assigning weights right now, you can do that later with your own models.
- be sure to be in an exactly sideways view, NUM3
- select weight 0.5, opacity 1.0, turn on wireframe
- press TAB to go into edit mode
- place the cursor over a bone in the spine (spine, I mean it)
- TAB back into weight paint mode
- right-click once
| DEBUGGING
If you later find you have weighted to too many bones or to wrong bones, you have to remove the vertices from the vertex groups. In Edit Mode, hit F9, in the Links and Materials tab are buttons for editing vertex groups. |
You've now selected the bone you want to paint weights for.
- "paint" the vertices next to the bone, all the way down to the belly. Hold the mouse button, drag down.
The area around the vertex becomes green. Green stands for weight 0.5, yellow for 0.75, red for 1.0, dark blue for 0, light blue for 0.25. Later you want to paint the vertexes next to the ones you just painted with a lower weight, the quickie way we're doing this here leads to edgy movements.
- paint each and every vertex using the steps outlined above
- do not weigh to the little bones on the belly or breast
The paint will "paint through" to the other side of the model. For the spine, that's good, for the legs, not so good. You will need to rotate your view alot. You can undo the last stroke with UKEY, and of course you can overpaint wrongly assigned vertices with weight 0 if weighting of the other side is unavoidable.
| DEBUGGING
If NIFskope shows parts of the model stretched to the Scene Root (generally on the "floor" in the center), or Oblivion or the CS shows the exploding polys effect (you'll understand), you forgot to rig a vertex. Each vertex must be rigged to at least one bone. If the scale and/or position of the model is all wrong in NIFskope and later in the CS the animation, you need to apply scale and position in Blender before exporting to .nif. Hit Ctrl-A. |
This will take a while ... leave no vertex out, and do not assign more than 4 bones to one vertex. You cannot really break something otherwise, and errors you make here will teach you a lot. Go and make some errors. It'll sometimes be funny, too!
- save, I saved as "goatbones.blend", as we entered a new state of the process
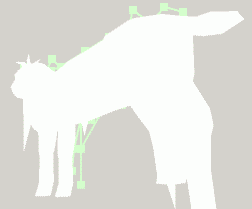
You can export your work now and look at it in NIFskope. The vertices you missed are drawn to the base of the world, which is luckily not that far away - in NIFskope. Below is an image with 4 errors I made in my weight paint job. They're a little hard to discern, because we assigned no material yet.
- from the menu, choose File>Export>NetImmerse/Gamebryo, export as goatbones.nif
- open goatbones.nif in NIFskope and check for errors
- correct errors in Blender, go back to step one until happy
- don't forget to save the corrected work in Blender
You cannot yet put the model into the CS, as we miss a material and a UV map.
UV mapping the model
The "UV" here is meant as coordinates, like XYZ on the axes in Blender. They point to a location in a texture file, which is a 2-dimensional picture. If you call the width the U axis and the height the V axis, and store values for these coordinates with the vertices in the model, you can effectively wrap a 2-dimensional picture around a 3-dimensional mesh. That's how texturing with pictures basically works, and it's the only method of texturing used for Oblivion. And Oblivion won't like it one bit if there is no UV mapping on the model.
We must assign a UV map to the model.
QUICKIE:
We're going to do a quickie with that one, as the making of a full blown UV map using multiple material IDs and whatnot should be the very last step. At least the model should be finished. Redoing the UV map later when the texture is already finished is going to be a real pain.
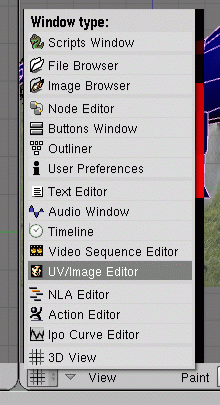
- here's the test I mentioned above: split the 3d viewport window, and set the window type to UV/Image Editor - check back with the Noob to Pro manual if you didn't grok that :)
- in object mode, select the mesh
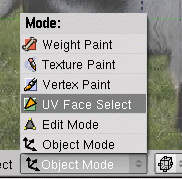
- switch to UV Face Select mode, all faces should be selected
- move mouse to the UV editor, from the bottom menu select UVs>ArchiMap UV Projection Unwrapper, let him at it (click OK)
- from the bottom window menu, UVs>Save UV Face Layout ..., make sure "Ob" is off, OK, name it goat
The result is a nearly unusable UV mapping. We don't care one bit - for now. With the last step we also created a simple texture file, goat.tga. Now we assign that to our model:
- in the buttons panel, select shading buttons (or hit F5)
- click "Add New" in the material tab
- in the texture tab (look right), click add new
- in the map input tab, click UV
- select texture buttons (F6)
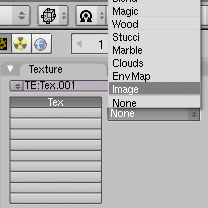
- set texture type from none to image
- in the newly appeared image tab, click load image, select goat.tga
- export to goatbones.nif: Menu File|Export|NetImmerse/Gamebryo
- don't forget to do a regular save
And we're done here:
- quit Blender
| DEBUGGING
Not UV mapping the model will result in emptiness in the CS and Oblivion. The model will just not show. |
Done!
LONG, PAINFUL, DRAWN-OUT PROCESS:
All about useful UV mapping can be read here.
Now let's move back to NIFskope.
Putting it all together
Now we have a .nif containing a skeleton, and a mesh. We're now going to mod the origninal sheep.nif to use our new mesh. Sounds like we're nearly there, doesn't it? And, want to know something? We don't need the skeleton, as we didn't need the sheep mesh in Blender before. But now, we don't simply delete it, we're just not going to copy it.
| DEBUGGING
Ignore ([X]) the message: infinite recursive link construct detected. If, on pasting the new mesh into the old file, you get an error message failed to map parent link "NiNode|oursheep" not all of the vertices are weighted. Go back to weight painting. The message failed to map parent link "NiNode|Bip01 Spine1 Bone10" on pasting means that the bone you weight painted to does not exist in the skeleton. I told you not to weigh to the small bones, didn't I? Go back there and read the debugging box. |
- open the sheep.nif in oblivion\data\meshes\creatures\oursheep folder, where we made ourselves a home some time before
- in NIFskope, select File>New Window
- in the new window, load goatbones.nif
- open NiNode 0 and Ninode 1, there you see the skeleton NiNode (number 2) and the NiTriShape node (number 47)
- right-click the NiTriShape node, Block>Copy Branch
- switch to the other NIFskope-Window with the skeleton
- Right click the Scene Root, Block>Paste Branch
- OK the version alert box
- Read the debugging box to the right
Now we need to parent the new mesh to the Scene Root again, only now we're not going to add something, but replace the mesh.
- In the Block Details (F2) of the Scene Root node, open the children list
- Replace the value 1 (sheep) there with our node number, 45
Now the old mesh is outside, and our mesh is inside the Scene Root.
- Delete the old mesh by right click>Block>Remove Branch
- Save the .nif as goat.nif in the Oblivion\Data\meshes\creatures\oursheep folder
We're done with the .nif for now, and can load the goat into the CS, and later into Oblivion. But we're coming back later for sure. Remember, this is an iterative process. That means we're going to do it all over again.
CS work: make a quickie mod
So far we have created a working .nif file. When we want to get it into Oblivion, we must make a mod. I'm really no expert on the CS stuff, but the following works. We will use the Construction Set to create a mod containing our creature.
- open the construction set
- load the Oblivion.esm: File>Data...>mark Oblivion.esm>OK
First, we need to create a new creature with our .nif.
- select Actors>Creatures>Creatures
- right click in the left pane, select New
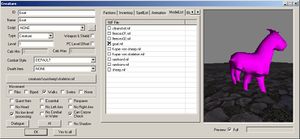
- In the new creatures dialog, ID an name "Goat"
- There, click "Add NIF file...", and use the skeleton.nif from the Oblivion\Data\meshes\creatures\oursheep folder, click OK
Clicking OK was neccessary here to get the CS to load the models and animations. We directly reopen the dialog, and activate our modded model.
- In the right pane, a new entry "oursheep" appeared in Actors>Creatures>Creatures, select that
- In the right pane is one entry "Goat", double click that
- From the tabs in the middle, select model list (look right)
- check goat.nif
- save everything before the next move!
Excited yet? You should be!
- in the right pane, hit preview
It doesn't look quite right, but that IS our model! Awesome, ain't it?
- switch to the Animations tab, and double click each animation
To make it look right, you'd start the next iteration of work: Finessing the model and the weight painting. But from this point on, you know that you can actually do it. Putting a goat into Oblivion is possible, and further work on the model, the weight painting, the UV mapping and the texture will not be for nothing.
Loading it into Oblivion: not tired of quickies yet
Seeing the creature in the CS is fine and dandy, but you probably want to see the creature in the game, not just in the CS. By now you probably want to hit it really hard. The correct way is to place the creature using the CS, fire up the game, go to the place where the creature should be, draw your sword and hit the thing. We're going to take a shortcut, which gives us a little more flexibility: We want to load the creature from the console.
The console command to load something a few paces in front of you is
player.placeatme FormID 1,250,0
The 1 means load one object, the 250 means "a few paces", and the 0 stands for "in front of the player". The FormID is a unique identifier for everything in the game, and it is written in hex. For the tests I did for this tutorial, the FormID was 10004C97. Here's how to get your FormID.
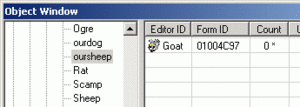
- in the Construction Set's object window, find the Actors>Creatures>Creatures>oursheep entry, click that
- in the left pane you see a table: Editor ID, Count, Users, ...
- between Editor ID and Count is a hidden column, open that by dragging the right of the two lines between them to the right
- there is a column named "Form ID"
The FormID there is 01004C97 not 10004C97 as I claimed above. That's because the first two digits are the mod number, in loading order, in hex. Since this is the most recently changed mod, it's always the last one. From here, you have two pathes.
| HINT
Never start Oblivion with the CS running in the background without having saved. At least minimize the Construction Set. For me, when I don't, Oblivion crashes most of the time, and takes the whole computer down with it. |
Either
- make your mod the first to load using OBMM, and use mod number 01
or
- count your active mods, add 1, convert that to hex, and have your mod number
Obviously, I run 15 mods. 15+1=16 converted to hex is 10, that's my mod number.
- write down the FormID
- also write down the command above
- close the Construction Set
- run Oblivion
- open the console
- type the player.placeatme command with your FormID in it
- whack away
Relieved? Good.
Additional NIFskope work: collision boxes
If you played around some with the goat in Oblivion, you may have noticed a few things, first that you sometimes can see into the model, and second, that when the creature is dead, the legs disappear in the ground. Both problems are due to collision boxes for sheep used on our goat - they're not really fitting.
...
Texturing quickie
As I'm not much of an artist, I can't really help you with actually drawing the texture. If you have nice pictures for the model, you can possibly use them to quickly cut&paste together a passable texture. I'd put the the saved UV layout we created during the UV mapping phase into a separate layer and draw on a see-through-layer on top of that. I believe texture sizes must be powers of two, e.g. 128x512, 1024x1024, 256x2048 and so on, but I may be wrong.
When you have fisnished the texture, it has to be in the right format and in the right place. There are may good guides on that on the CS wiki, but here's a quickie using The Gimp. The Photoshop way may be easier - if you have Photoshop.
| DEBUGGING
If you later have pink models, the CS or Oblivion couldn't find the textures. Check the entries in the NiTextureProperty you set. If everything is correct, you may have the usual trouble which BSApatcher solves. |
Tools required: gimp (free) and the gimp DDS plugins (also free)
- create/open the texture file in gimp
- save as .dds file in oblivion\data\textures\creatures\goat\goat.dds
- select DXT3, check create mipmaps
Now, open the goat.nif again with NIFskope.
- in the Block List, open Scene Root>NiTriShape>NiTexturingProperty
- set the value of the NiSourceTexture in there to textures\creatures\goat\goat.dds
