Difference between revisions of "3ds Max: Exporting Rigged Models"
imported>Qazaaq m (tutorial category) |
imported>QQuix (Byline removed) |
||
| (3 intermediate revisions by 2 users not shown) | |||
| Line 1: | Line 1: | ||
{{Update}} | |||
= | |||
==Introduction== | ==Introduction== | ||
| Line 53: | Line 55: | ||
If you're not already using it, I highly recommend learning to. It allows you to do many things including weight painting (like using a paintbrush to brush on weights on the model; they are even all colour coded) and individual selection, copying, pasting and weighting of vertices on the mesh. | If you're not already using it, I highly recommend learning to. It allows you to do many things including weight painting (like using a paintbrush to brush on weights on the model; they are even all colour coded) and individual selection, copying, pasting and weighting of vertices on the mesh. | ||
[[Category: | [[Category:Modeling Tutorials]] | ||
[[Category:Tutorials]] | [[Category:Tutorials]] | ||
Latest revision as of 07:54, 23 June 2012
This article has been marked by editors as one needing attention. Please see the Talk page for details. If you can update the article, please do so.
=
Introduction[edit | edit source]
Well, after learning from LC ameral oh so long ago, and having learned a lot more through fiddling around through trial and error, and then having thought quite a bit since then how to use Max in this manner, most recently madmole, I decided it was ridiculous that this info wasn't particularly widely available and it was still pretty much passed on from one modder to another. So I decided to make a little post that may help some people with this. Note I am not going to attempt to teach anyone how to rig, but feel free to ask. I do know a fair bit about the skin modifier, next to nothing about physique though.
Things you will need[edit | edit source]
The Civ4 Nif plugin you can get it HERE
The Max importer/exporter
you can get that from HERE
Process[edit | edit source]
Once you have both of those plugins installed and working properly you should be able to both import and export NIF files from max.
1. Import the NIF files from the creature/character you want. These are only really useful as reference though, since hopefully you already have a body part or armour piece you want to place into oblivion.
2. Using skin or physique add all the bones you just imported to your mesh. For most of the characters/animals in oblivion they will all be named as bip01-etc
3. Re-import skeleton.nif again for the character or animal that you are modding. This is VERY important, since for the Civ4 exporter to export a working NIF for Oblivion, the skeletal info must be after the mesh info in the file. You can check if it is by going to File=> Summary Info in Max. Check the list; if your mesh is at the top and the skeleton is at the bottom you're all good.
4. Hide everything but the object you want to export. Note that on the final version of the model you will want to delete everything before export, since for some reason the Civ4 exporter still exports some of the hidden info.
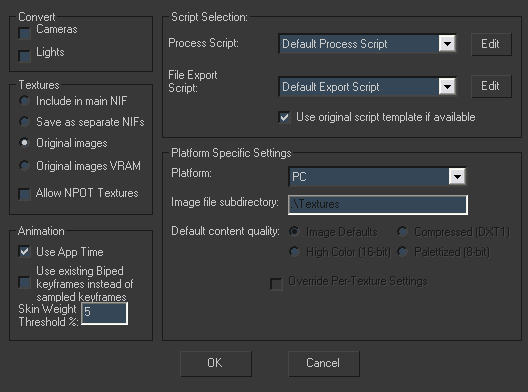
5. Export using the Civ4 plugin using these settings:

IMPORTANT NOTES![edit | edit source]
For me, NifSkope hangs up horribly when a texture is not specified for a model. Since the Civ4 exporter won't export directory structures for the textures, I recommend placing a copy of your texture in the Data folder. This is the base folder and will allow both Oblivion and NifSkope to find a texture, even though it should only be a temporary measure while testing (it allows you to simply export without doing editing in NifSkope).
Some people have said they can't get the two plugins working side by side. For me, at least, I can export using the Civ4 by only specifying the name, but not the file type. For instance telling it to export "armor" will work and cause the Civ4 exporter to run, but typing armor.nif will cause the NifTools exporter to run, which you don't want.
Using the importer you can import the KF animation files. This is very useful to test how your rigging is working while in 3DS Max. Simply select File => Import NIF/KF and find the animations for your character/animal. To remove the data that it imports (you will want to before you export, or to import another animation) select everything and delete all key frame, then import skeleton.nif again.
The importer currently is only importing 3 bone weights, whereas the original meshes from Oblivion often have 4 in places. This will prove problematic if you are attempting to join up a mesh to an existing one. For instance attempting to make the neck on your shiny new chest plate join perfectly with the stock head models is pretty much impossible at this stage.
Notes About Skin Modifier[edit | edit source]
If you're not already using it, I highly recommend learning to. It allows you to do many things including weight painting (like using a paintbrush to brush on weights on the model; they are even all colour coded) and individual selection, copying, pasting and weighting of vertices on the mesh.