Difference between revisions of "Intro and Landscaping"
Jump to navigation
Jump to search
imported>Maturin |
imported>JBurgess |
||
| Line 38: | Line 38: | ||
*** These two rows can be used to store colors you use frequently | *** These two rows can be used to store colors you use frequently | ||
<pre> | <pre> | ||
Don't worry if you don't understand everything here right away. We'll cover each section in the tutorial | Don't worry if you don't understand everything here right away. | ||
We'll cover each section in the tutorial | |||
</pre> | </pre> | ||
<br>Part 2: [[Height Editing]] | <br>Part 2: [[Height Editing]] | ||
Revision as of 20:30, 27 March 2006
Introduction
This tutorial covers the basics of manually performing landscaping tasks. The skills emphasized here will focus on editing small areas in fine detail.
This tutorial is a continuation of the My First Dungeon tutorial. If you did not complete that tutorial, we'll be using an exterior cell in the "Tamriel" worldspace at 13,-12. We dropped the following items into the space, which you can also do now:
- CEntranceRockMossLG01
- CDoor00
- LL1BanditCamp50
- MapMarker
Landscape Mode
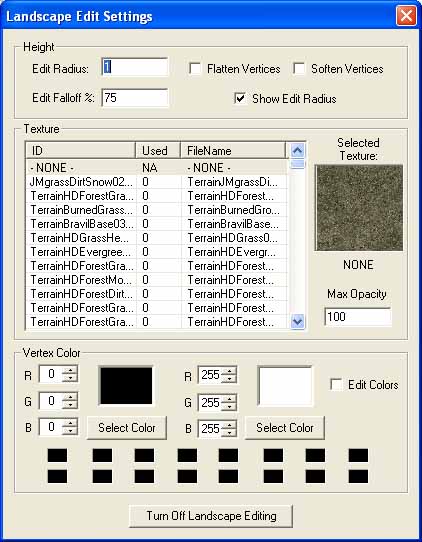
With the cell loaded, press "H" to enter Landscape mode. This changes your cursor into a landscaping tool and brings up the Landscape Edit Settings panel. There's a lot of information here, so let's study it a moment.

- Height
- Edit Radius
- This setting determines the size of your cursor tool.
- Edit Fallout %
- Not used in current version
- Flatten Vertices
- Checking this box will cause your tool to flatten land
- Soften Vertices
- Checking this box will cause your tool to smooth land
- Show Edit Radius
- Toggles display of cursor tool.
- Edit Radius
- Texture
- Texture List
- All the landscape textures available to you.
- Selected Texture
- A preview of the currently selected texture
- Max Opacity
- Lowering this setting is useful for blending textures
- Texture List
- Vertex Color
- RGB (left)
- The color here determines your left-click shading value
- RGB (right)
- The color here determines your right-click shading value
- Save colors
- These two rows can be used to store colors you use frequently
- RGB (left)
Don't worry if you don't understand everything here right away. We'll cover each section in the tutorial
Part 2: Height Editing