[dismiss]
This wiki is a copy of the original Oblivion CS wiki created and maintained by the UESP.net. See CSwiki:Copy Notice for more info.
Intro and Landscaping
(Redirected from Basic Landscaping 1.Intro and Landscaping)
Jump to navigation
Jump to search
Introduction[edit | edit source]
This tutorial covers the basics of manually performing landscaping tasks. The skills emphasized here will focus on editing small areas in fine detail.
This tutorial is a continuation of the My First Dungeon tutorial. If you did not complete that tutorial, we'll be using an exterior cell in the "Tamriel" worldspace at 13,-12. We dropped the following items into the space, which you can also do now:
- CEntranceRockMossLG01
- CDoor00
- LL2BanditCamp50
- MapMarker
Landscape Mode[edit | edit source]
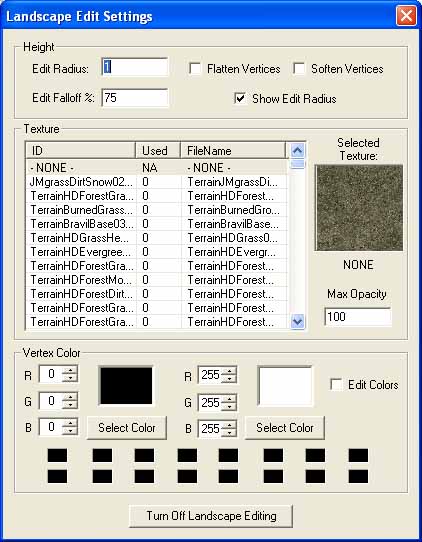
With the cell loaded, press "H" to enter Landscape mode. This changes your cursor into a landscaping tool and brings up the Landscape Edit Settings panel. There's a lot of information here, so let's study it a moment.

- Height
- Edit Radius
- This setting determines the size of your cursor tool.
- Edit Falloff %
- Not used in current version
- Flatten Vertices
- Checking this box will cause your tool to flatten land
- Soften Vertices
- Checking this box will cause your tool to smooth land
- Show Edit Radius
- Toggles display of cursor tool.
- Edit Radius
- Texture
- Texture List
- All the landscape textures available to you.
- Selected Texture
- A preview of the currently selected texture
- Max Opacity
- Lowering this setting is useful for blending textures
- Texture List
- Vertex Color
- RGB (left)
- The color here determines your left-click shading value
- RGB (right)
- The color here determines your right-click shading value
- Save colors
- These two rows can be used to store colors you use frequently
- RGB (left)
Don't worry if you don't understand everything here right away.
We'll cover each section in the tutorial
Tip:
With this window open, you may want to expand the ID column so you can read the
whole ID and then click the ID header to sort by ID.  You will notice that many
ground textures have pairs that look the same in the preview (as well as in the
render window) but one will say "NoGrass" in the ID.  In the game, the ones that
don't have the "NoGrass" name will generate in-game grass.  While this may seem
obvious it isn't so obvious in the render window of the TCS which doesn't show
any grass.  Near trails and paths, be sure to select the "NoGrass" version of the
texture you want to apply.  By sorting the list by ID, you will put the Grass
and NoGrass versions next to each other for easiy switching.
Part 2: Height Editing