Difference between revisions of "Start Your Mod"
imported>Decoup |
imported>Darkness X |
||
| (9 intermediate revisions by 4 users not shown) | |||
| Line 1: | Line 1: | ||
{{Featured}} | |||
The aim of this tutorial is to teach modders how to make their mods start the next time the player loads a save file with the mod activated. The method described is similar to the way that every official mod in integrated into the game, thus creating a more professional feel to your mod. | The aim of this tutorial is to teach modders how to make their mods start the next time the player loads a save file with the mod activated. The method described is similar to the way that every official mod in integrated into the game, thus creating a more professional feel to your mod. | ||
| Line 10: | Line 10: | ||
*Informs the player in the game where to go instead of relying on the read me files in the mod, thus creating a better role-play environment. | *Informs the player in the game where to go instead of relying on the read me files in the mod, thus creating a better role-play environment. | ||
{{Tools|req0=[[The Elder Scrolls Construction Set|Construction Set]]}} | |||
== Step 1 - Creating the script == | == Step 1 - Creating the script == | ||
A script is used to give the player any objects they require for the mission. The following example is for a mod which gives the player a new spell. | A script is used to give the player any objects they require for the mission. The following example is for a mod which gives the player a new spell. | ||
[[Image:StartScript.jpg]] | |||
Items to note: | Items to note: | ||
*The script type is set to quest because we will use a quest to initiate it | *The script type is set to quest because we will use a quest to initiate it | ||
*The if statement will prevent the script from running until the character creation process is finished, and will not run if the player is in combat. This is an important line because it ensures that the quest starts at an appropriate time. | *The if statement will prevent the script from running until the character creation process is finished, and will not run if the player is in combat. This is an important line because it ensures that the quest starts at an appropriate time. | ||
*The [[StopQuest]] command is very important to end the script. However, since you have not made the quest yet, you may have to come back to this step. | *The [[StopQuest]] command is very important to end the script. However, since you have not made the quest yet, you may have to come back to this step. | ||
This | This script simply gives the player a few spells with a lame message to inform them what is happening. | ||
The following script is an example of how to give the player a note and a key. This example could be used in scripts which give the player a house. | The following script is an example of how to give the player a note and a key. This example could be used in scripts which give the player a house. | ||
| Line 28: | Line 31: | ||
</pre> | </pre> | ||
When using a script similar to this one it is recommended that the player be somehow informed that they have received the new items. This can be done in several ways including: | When using a script similar to this one it is recommended that the player be somehow informed that they have received the new items. This can be done in several ways including: | ||
*A [[journal]] entry in the quest we will soon be creating | *A [[:Category:Journals & Stages|journal]] entry in the quest we will soon be creating | ||
*A [[message]] command | *A [[message]] command | ||
*An [[activate]] command to make the note or book open. | *An [[activate]] command to make the note or book open. | ||
| Line 48: | Line 51: | ||
== Recommendations== | == Recommendations== | ||
You may like to make your quest show map markers to locations or include journal entries about your quest. These features fall outside the scope of this tutorial and are already covered in other areas of the wiki. I have included a few links that may help out. | You may like to make your quest show map markers to locations or include journal entries about your quest. These features fall outside the scope of this tutorial and are already covered in other areas of the wiki. I have included a few links that may help out. | ||
<br>[[Quests]]<br>[[Journals & Stages]]<br>[[Quest Targets]] | <br>[[:Category:Quests|Quests]]<br>[[:Category:Journals_%26_Stages|Journals & Stages]]<br>[[:Category:Quest_Targets|Quest Targets]] | ||
[[Category: Tutorials]] | |||
[[Category:Scripting_Tutorials]] | |||
[[Category:Quest_Tutorials]] | |||
Latest revision as of 09:59, 15 April 2010
This article is a Featured Article. This means that it has been found to be among the best articles on the Wiki, and that it may serve as an excellent example of what articles should strive for.
The aim of this tutorial is to teach modders how to make their mods start the next time the player loads a save file with the mod activated. The method described is similar to the way that every official mod in integrated into the game, thus creating a more professional feel to your mod.
The majority of mods I have downloaded require the player to:
- use console commands to get the items or spells
- require the player to find an item only identified in the read me file
By the end of this tutorial you should be able to make a mod that:
- Activates the next time you play with a new or existing character
- Informs the player in the game where to go instead of relying on the read me files in the mod, thus creating a better role-play environment.
| Tools used in this tutorial
Required |
Step 1 - Creating the script[edit | edit source]
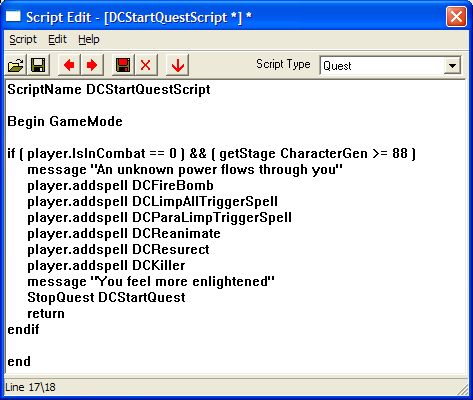
A script is used to give the player any objects they require for the mission. The following example is for a mod which gives the player a new spell.
Items to note:
- The script type is set to quest because we will use a quest to initiate it
- The if statement will prevent the script from running until the character creation process is finished, and will not run if the player is in combat. This is an important line because it ensures that the quest starts at an appropriate time.
- The StopQuest command is very important to end the script. However, since you have not made the quest yet, you may have to come back to this step.
This script simply gives the player a few spells with a lame message to inform them what is happening. The following script is an example of how to give the player a note and a key. This example could be used in scripts which give the player a house.
if ( player.IsInCombat == 0 ) && ( getStage CharacterGen >= 88 )
	player.additem NewHouseNote 1
	player.additem NewHouseKey 1
endif
When using a script similar to this one it is recommended that the player be somehow informed that they have received the new items. This can be done in several ways including:
- A journal entry in the quest we will soon be creating
- A message command
- An activate command to make the note or book open.
Step 2 - Creating the quest[edit | edit source]
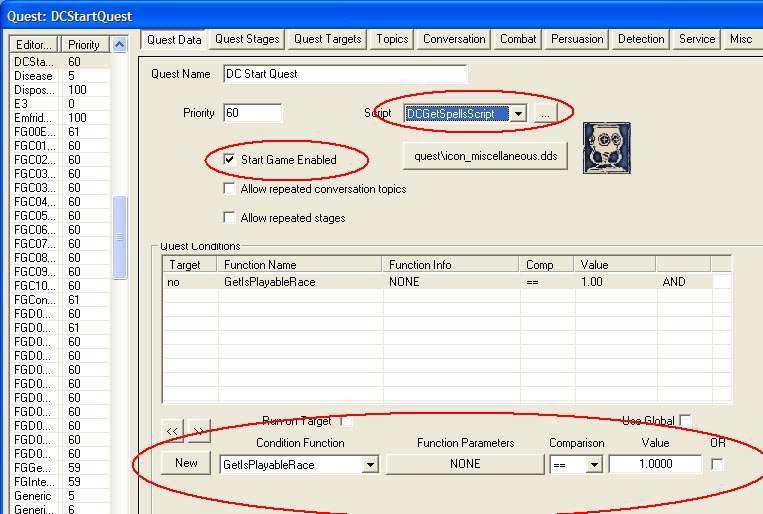
In the editor open the quests window and create a new quest by right clicking on the list of quests and selecting 'new'. Give the quest a meaningful name that will make it easy to locate. Enter the information indicated in the following picture.

Use the following settings:
- I recommend a priority of 60 simply because that the the value I have found in use in similar scripts.
- Set the script to the one that you created earlier.
- In every example I have found so far the condition GetIsPlayableRace was used. I am not certain if it is required.
- Choose an appropriate quest icon. I use icon_miscellanious.dds the majority of the time.
If you have not already done so remember to go back and attach the script to the quest you created earlier.
Save and Test[edit | edit source]
You have now completed all the required steps to make your mod automatically include your new objects or spells in the game world.
Recommendations[edit | edit source]
You may like to make your quest show map markers to locations or include journal entries about your quest. These features fall outside the scope of this tutorial and are already covered in other areas of the wiki. I have included a few links that may help out.
Quests
Journals & Stages
Quest Targets
