Difference between revisions of "Loading Screen Images"
imported>Slserpent m (→Notes/Tips: i take that back. it's dxt5 :P) |
imported>Slserpent m (→Notes/Tips: paths are case-sensitive in this case) |
||
| Line 18: | Line 18: | ||
An image editor with good support for layers (PhotoShop or Paint Shop Pro) is a must for creating loading screens. | An image editor with good support for layers (PhotoShop or Paint Shop Pro) is a must for creating loading screens. | ||
Loading screens will only work if placed in ''Oblivion\Data\Textures\Menus\Loading''. This is case-sensitive! | |||
== Step-by-Step Guide using Paint Shop Pro 10 == | == Step-by-Step Guide using Paint Shop Pro 10 == | ||
Revision as of 03:30, 21 June 2006
Notes/Tips
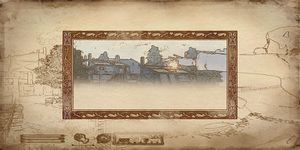
Loading screen images are 1024x512. The odd aspect ratio should be okay when the image is displayed in-game.
The outer area of the loading screen has no colors; it is only composed of an outline of the starting image. The outlines are created with a find edges filter.
High luminance (white) portions of the starting image should be made transparent so that the underlying paper can be seen instead.
The outlines on the inner area are thicker than those of the outer area.
There are two regions where the opacity is reduced so that only the paper background is visible. One is for the "Loading..." bar, and the other is for the tip.
The inner border and paper textures can be gotten from a PhotoShop image included with Oblivion at \textures\menus\loading\load_troll.psd. Use an unpacker to extract this file from Oblivion - Textures - Compressed.bsa.
Alpha channels are not used for the final image.
Loading screens are compressed using the DDS DXT5 format with no MIP-maps.
An image editor with good support for layers (PhotoShop or Paint Shop Pro) is a must for creating loading screens.
Loading screens will only work if placed in Oblivion\Data\Textures\Menus\Loading. This is case-sensitive!
Step-by-Step Guide using Paint Shop Pro 10
WIP
Modding and DDS Conversion
WIP
Scripts
Scripts (or macros) can be used to automate the process of creating a load screen. Preferrably, they allow one to start with a screenshot from the game and turn that directly into an image in the same style as Oblivion's load screens.
Paint Shop Pro 10
Download the script here.
Before you can run the script, you must open the load_troll.psd mentioned in the notes. Then load the image you want to convert to a load screen. You cannot have any other images open, or this probably won't work. Finally, run the script provided (File>Script>Run), and after a few seconds, you should have a pretty loading screen ready for conversion to DDS.
If you run the script in interactive mode (that's the default), you'll be prompted to set the luminance ramps for a couple parts of the image during the script execution. The first is for tweaking the outline "sensitivity"; more contrast here is usually best. The second is for the opacity of the colors in the center area. You may also want to tweak the saturation layer opacity for said colored center area. However, the defaults should work well for 90% of screenshots.
PhotoShop
(Somebody do this. I don't use or like photoshop.)
