Difference between revisions of "Basic NPC Patrols Tutorial"
imported>DragoonWraith (Featured) |
imported>Wrye (Update links.) |
||
| Line 1: | Line 1: | ||
{{Featured}} | {{Featured}} | ||
Patrols can be a tremendous boon when trying to make an area feel more lifelike. This tutorial will share a technique for quickly creating a very basic two-point ("ping-pong") patrol and getting it in-game. The user should have a basic understanding of [[Basic_NPC_Creation_Tutorial|NPC]], [[ | Patrols can be a tremendous boon when trying to make an area feel more lifelike. This tutorial will share a technique for quickly creating a very basic two-point ("ping-pong") patrol and getting it in-game. The user should have a basic understanding of [[Basic_NPC_Creation_Tutorial|NPC]], [[:Category:Packages|package]], and [[Pathing_and_Playtesting|pathgrid]] editing with the CS. | ||
==Package Setup== | ==Package Setup== | ||
Revision as of 21:08, 5 June 2008
This article is a Featured Article. This means that it has been found to be among the best articles on the Wiki, and that it may serve as an excellent example of what articles should strive for.
Patrols can be a tremendous boon when trying to make an area feel more lifelike. This tutorial will share a technique for quickly creating a very basic two-point ("ping-pong") patrol and getting it in-game. The user should have a basic understanding of NPC, package, and pathgrid editing with the CS.
Package Setup
The very first thing we want to do is create an NPC to put these packages on. Open the NPC "BanditMeleeMale2" and give it the new ID "MyPatrolTemplate01". More on why we chose this ID later. Open the AI panel on this new NPC. We can delete the standard bandit packages, but it's a good practice to leave a basic wander at the bottom of every NPC's package stack as a failsafe. Go ahead and remove BanditSleep4x4 and BanditGruntWanderExterior now.
From the main tool bar, open the packages window. (character>>packages) Locate the package GuardPatrolBeginPatrol. This is a standard package that serves as the base for all patrols set up by this technique. Before we go any further, we need a space to set up the patrol. In hindsight I wish I had used a patrol in Vilverin, so let's remedy that error now. Load it from the cell list and let's take a look at the main chamber.
There are a few things to keep in mind when choosing a patrol path. Avoid a route that will cause the NPC to walk through traps or other dangerous areas. Also keep in mind that any combat encounters along the route should be balanced with the patrol NPC in mind. You also want to choose a long enough route that the player won't see the ping-pong behavior, which makes the patrol feel artificial.
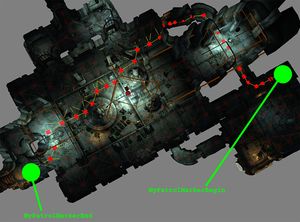
The route I've chosen for this patrol will be marked by two xmarker static objects. I'll name them MyPatrolBegin and MyPatrolEnd for clarity, and place them as pictured at the right. I've also highlighted the predicted patrol route in that image. However, those xmarkers are meaningless without a package, so let's create that now.
From the package window, right click and choose "New", and perform the following:
- Give it an ID of MyPatrolPackage
- Change type to Travel
- Check the box Must Reach Location
We also need to give this package a destination. Click the Location tab and tick radio button Near Reference, then click Select Reference in Render Window and double-click the xmarker "MyPatrolEndMarker". Finally, open the Conditions tab, right-click in the list, and create a new condition. Choose GetDistance from the drop-down list below, and under function parameters we want to choose "MyPatrolBeginMarker". Leave the default "<" comparison and increase the value to 512.
Remember our "MyPatrolTemplate01" NPC? Let's add the GuardPatrolBeginPatrol and our new MyPatrolPackage packages to his AI package list. Be sure that the packages are in this order:
- MyPatrolPackage
- GuardPatrolBeginPatrol
- BanditGruntWanderInterior
I usually like to place a "Torch02" object in the inventory of a patrol NPC when I can - it helps pop them out of the environment and draw attention to the motion in the environment.
Adding other behaviors is easy. Just stack packages for the other behaviors desired - sleeping, reading, etc - above your patrol packages and use time of day constraints. Your NPC will process those packages first, and only patrol when no other activity is scheduled.
You can place the NPC in the level and test at this point, but it's important that you place the NPC at the location of the MyPatrolBeginMarker. Let's analyze how this technique works.
Why it Works
A little study of the package settings can reveal the inner workings of this technique and our AI travel packages. If you look at the GuardPatrolBeginPatrol package, you'll notice it's nothing but an order to travel back to the NPC's editor location (where it was placed in the CS) with a "Must Reach Location" flag. There are no conditions, so this package will always run when the it comes up in the stack.
However; MyPatrolPackage is above it in the stack, and is processed first. The condition test GetDistance MyPatrolBeginMarker < 512 will pass on the first frame after this NPC is loaded because MyPatrolBeginMarker is synonymous with the NPC's editor location. This condition continues to pass until the NPC is more than 512 units from it's editor location, so why doesn't he turn around before reaching his destination?
Because of the "Must Reach Location" flag. Even though the NPC "wants" to turn around and head back once it's 512 or more units from his editor location, he won't do so until he's reached the MyPatrolEndMarker object and re-analyzes his AI stack.
This technique can also be extended to robust, multi-point patrols by creating packages between the first patrol point and the GuardPatrolBeginPatrol package.
Using Templates
Often we want more variety than a specific NPC always on patrol in a dungeon, however, and templates are a way to acheive this variety without the labor of creating several new NPCs or creatures to feed into a specific leveled list.
Instead we can create a custom version of an existing leveled list which uses our NPC as a template. Leveled lists inherit the following traits from their template:
- AI
- Faction
- Script
- Death Item
- CombatStyle
- No Persuasion Flag
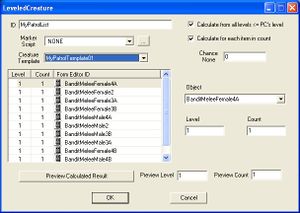
Let's use the LL1BanditMelee100 list as a base. Open it and change the ID to "MyPatrolList", as well as choosing "MyPatrolTemplate01" as the Template. Click OK and create the new object, and place it at the MyPatrolBeginMarker, removing the NPC if you placed him earlier for testing.
Testing and Tweaking
Testing is as simple as firing up the editor and observing the NPC behavior in that cell. The most common mistake is to choose the wrong markers in the Conditons/Location. Also remember that if you choose to move markers around, the NPC/List must stay with the begin marker or the packages will break. If you're having trouble getting the NPC to take the route you want, remember that you can alt-click on existing pathnodes to create blue, preferred nodes.
And that's about it. With this method you should be able to quickly and easily get NPC patrols running in dungeons and any other place you want to set them up. Good luck!

