Pathing and Playtesting
(Back to Furniture, Traps, and Lighting)
Pathing[edit | edit source]
Pathnodes are placed to create a network which AI uses to navigate the cell. While certain aspects of AI may not use the pathnodes, most navigation is handled by analyzing this network. Thus it's very important to pathnode our cells carefully to get good behavior from our NPC's.
Press the dotted button circled in the image above to switch to pathnode mode in the CS. Depending on your viewing angle, you may notice a pre-existing network of pathnodes in the cell. Remember the cell we duplicated way back at the beginning of this tutorial? Pathnodes exist in parrallel of the cell, so they can only be manipulated, created or deleted in this mode. (Notice also that you cannot select or otherwise affect the regular cell objects in this mode.) Drag a selection box around the old nodes and delete them now. Move the camera around to make sure you got them all.
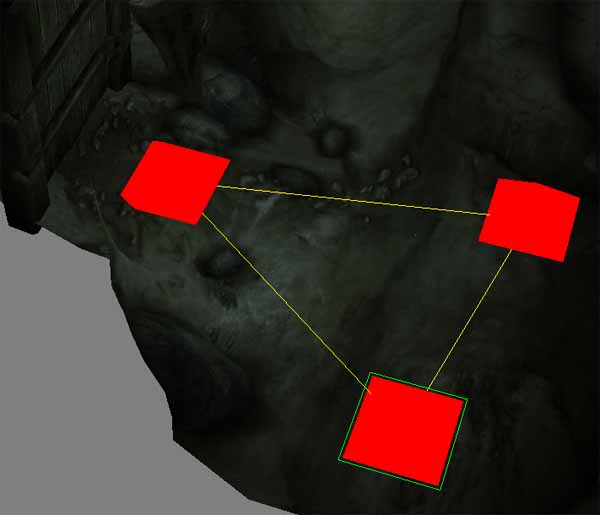
Maneuver your view to the dungeon entrance and go into pathnode mode. Right click the floor just inside the door. This creates a basic node. Now, while holding "ctrl", click to create another where the entrance widens. Notice the yellow line linking these? That means the AI will see a valid path between the two points. Note that this overrides what you may consider "common sense". Be sure that these paths actually are valid.
Good pathing is learned from lots and lots of testing. Use the TPG console command in-game to observe pathnode networks. The TPL console command shows the planned paths chosen by AI, which is also good when debugging. Remember, also, that larger enemies, such as Frost Atronachs, can be summoned anywhere; and such large monsters have different pathing needs.
Notice the green outline around the new node? This means it's currently selected. Still holding "ctrl", create a third node by right-clicking the floor. Let's link this one back to the entrance node we originally placed. To do this; continue holding "ctrl" and left-click the node in question. All 3 nodes should now be linked as shown below:
Make a mistake on selecting a link? "ctrl" left-click again on the node to remove the link.
Using this basic procedure, path the entire cell. Take your time and be mindful of the dungeon surroundings, using "F4" to toggle collision geometry if you need to.
Using the "alt" key, you can create blue pathnodes. These special nodes indicate a preferred path for the AI. This is mostly useful for roads, bridges, and city sidewalks, but can be used for special cases in dungeons.
The trap we placed earlier creates a problem. As it's pathed now, AI will walk through and trigger the trap.
This can be cool, but usually happens off-screen, which does nothing for the player's experience.
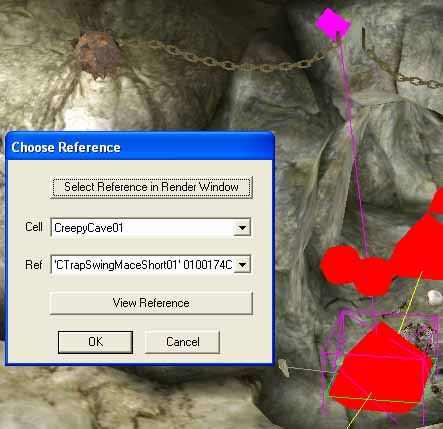
In certain cases it is appropriate to ignore this problem, or to break the pathnode network here, but we can also set the pathnode to become active only after the trap has been triggered. To do this, select the path node closest to the tripwire, and press "R". Using "Select Reference in Render Window", pick one of the maces. The purple cage around the node now indicates that it is linked to the trap.
Playtesting[edit | edit source]
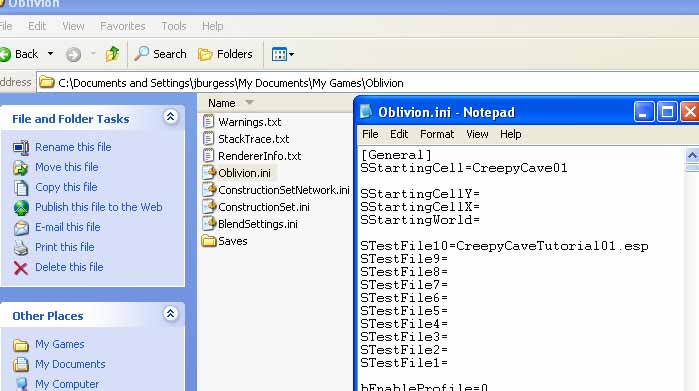
Let's save and have our first playtest. To do this navigate to your "Oblivion.ini" file. This is automatically stored in the Oblivion folder in your My Games folder (My Documents\My Games\Oblivion\Oblivion.ini). Open the file and add "CreepyCaveTutorial01.esp" as one of the STestFiles, and change the SStartingCell to "CreepyCave01". (Change names if you named yours differently.) Refer to this image for reference:
Now when you start Oblivion, you will begin as a default level 1 character in the chosen cell. Please note that if you want to test the cell at different levels, you must start outside that cell, manually adjust your level, and only then load into the cell.
While playtesting, pay attention to all the things you've done so far and how they actually play out in-game. You may want to make a save at the start of your session and re-load it several times, focusing on a different aspect of the dungeon each time.
Console commands are very handy for playtesting. Here are a few you might want to use:
- TGM
- God mode
- TCL
- Turn off collision on either yourself or the selected object
- TAI
- Toggle AI processing
- Player.setAV speed 100
- Sets speed to 100 - can be used for all skills and attributes.
- TPL
- Shows the planned paths chosen by AI
- TPG
- Used to observe pathnode networks
One improvement from Morrowind is the ability to use batch files for console commands. To do this, create a basic .txt file containing the commands you want to call in-game. Save this file in your main Oblivion directory with a meaningful name. In-game bring up the console (~) and type "Bat filename.txt" to call the commands.
We've still got ground to cover before this dungeon is any good to somebody who wants to play it - let's keep moving forward.
Linking Cells and Connecting to the Outside World


