Retex Guide
| Tools used in this tutorial
Required Optional |
Retexturing Items for TES4: Oblivion[edit | edit source]
First, you will need the following programs and plugins for this tutorial:
- Either Corel PaintShop Pro or Adobe Photoshop - You'll need one of these in order to edit your texture. GIMP may also be used, I've heard.
- The NVidia's DDS Plugin - You'll need this to open and save DDS files in one of the above programs.
- BSA Commander or TES4BSA - To unpack the mesh and texture files.
- NifSkope - Be sure to download the newest version. This will allow you to preview a mesh and rename texture paths.
- Alternatively: NIBlE
- (Optional) The DDS Thumbnail Viewer - - lets you see a thumbnail of the texture in Windows Explorer.
This tutorial assumes that you have read the readme's for TES4BSA and NifSkope and have installed them and set them up correctly. This also assumes that you installed Oblivion in the default folders - if you haven't, then substitute your file path for "C:\Program Files\Bethesda Softworks\Oblivion" down below.
Once you have these, you can start your first texturing mod. Read on, intrepid texturer!
The first step you'll need to take to retexture an item is to unpack the BSA files. You will need approximately 3.2GB's of hard drive space in order to do this. The files you will need to unpack are located in the "C:\Program Files\Bethesda Softworks\Oblivion\Data" folder and are called "Oblivion - Meshes.bsa" and "Oblivion - Textures - Compressed.bsa". Run TES4BSA to unpack these - instructions on how to do this are included in the download. I won't go in to details, as the program may change in the future.
Once you've unpacked your files (this can take awhile, btw), the next step you'll need to take is to decide what to retexture. I have decided to retexture the "mushroomtoadstool01.nif" file, as I want a bluegreen-toned mushroom to use as a "Luminous Russula" mushroom.
Editing the mesh - Method 1: NifSkope[edit | edit source]
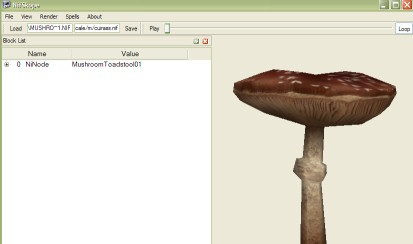
Open up the Nif in NifSkope (double click the nif file). You should see something similar to this:
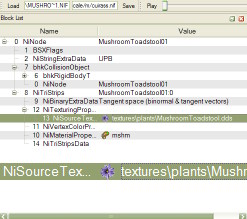
This is how meshes appear in NifSkope. You will need to expand the + boxes in order to see the information on the mesh. Right now, however, most of that info is irrelevant. All you need to find is the texture information. Below is an image showing what you are looking for.
If you are looking at a different mesh, the location of the texture line will be different, but this gives you the basic idea of what to look for.
Editing the mesh - Method 2: NIBlE[edit | edit source]
Open the nif in NIBlE. Then hit the Texture Manager-Icon or select Texture Manager from the Tools-Menu, which will open the following window:
Select the texture reference you want to change, then Browse for an alternative with "...", drag&drop an texture file to the input field or just enter the Path and filename manually, NIBlE will try to handle the path-cutting. Hit "Done" when you're done and save the file.
Editing the texture[edit | edit source]
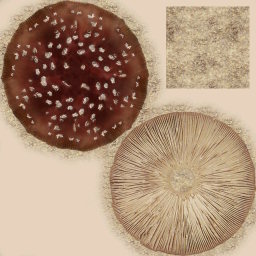
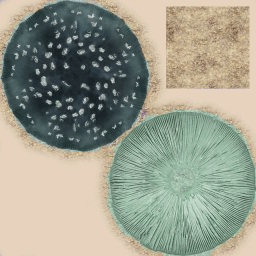
What you need to do now is find and open the texture file. The mesh gives you the path to the texture file, so now all you need to do is locate it and open it up in your graphics editor. How you texture your object is completely up to you, but for my mushroom I simply recolour the cap portion of the texture. You can see, below, the before and after texture. I'm afraid I wasn't terribly precise and didn't worry about its look - this is just for this tutorial :p
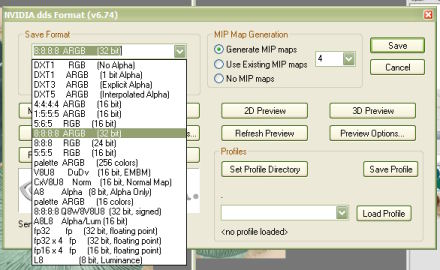
Now comes the part a lot of people are having trouble with - saving the textures. You need to be sure that the texture has the same name as the mesh, so when I rename my mushroom mesh "VixLuminous.nif", my texture will be named "VixLuminous.dds". Otherwise, the texture will not load. You can create new folders for your texture files, so long as they reside inside of the "Data/Textures/" folder you should be fine. For the main texture, I saved this as the images below show. Note that for alpha enabled meshes, you will likely need to save using the Alpha specific formats in the dropdown menu.
You need to make sure that normal maps are disabled while saving. It should look like this:
Now just save the file! There. Almost done - two more steps to go.
Most objects use a Normal Map as well as the texture. This, too, is something a lot of people are having trouble with. To create a normal map, save a copy of your texture file as you did before, but this time, add a "_n" at the end. In my case, the file will be called "VixLuminous_n.dds". Now, go to resave, only this time when you get the DDS format box, change the Save Format to "DXT5 (ARGB) Interpolated Alpha". Then, click on the Normal Maps button again, and recheck the box up in the corner. This will save it correctly. If you hit the 2D Preview button, you'll see a very weird texture that will probably be neon coloured. This is correct.
And now, the final step - apart, of course, from adding the new mesh to the game, something I won't be covering in here. You need to add your texture file to the mesh.
To do this, open up the mesh again in NifSkope, and go down to the texture path again. Edit it to point to your new texture file, and save. You will not, btw, need to point it to the "_n.dds" file - it will do this automatically. If it shows correctly in NifSkope, you put the file path in right, if not, check your spelling. Otherwise... you're done! Hurray!
