GIMP: Wanted Poster
| Tools used in this tutorial
Required
|
The goal of this tutorial is to teach you a way to retexture the Gray Fox wanted posters. You will need the following programs to follow this tutorial.
You'll also need one of the following programs to unpack the necessary dds files from your bsa file.
Oblivion Mod Manager (If you don't have this I highly recommend it as unpacking files from your bsa's is just a small feature of this great program).
Note: My tutorial will directly contradict some retexturing tutorials I've read on this website. My method also sets up some of the files differently then vanilla Oblivion sets up these files. I have tried their ways to do this and it didn't work for me. I've tried many other combinations and this seems to be the only one that works on my system. Feel free to experiment if you wish.
Step by step instructions[edit | edit source]
1. Unpack the following files from "Oblivion - Textures - Compressed.bsa"
  textures\clutter\books\wantedposter.dds
  textures\menus\books\wantedposter.dds
  textures\menus50\books\wantedposter.dds
  textures\menus80\books\wantedposter.dds
2. Open the dds file - textures\clutter\books\wantedposter.dds in Gimp. You'll probably get an error message saying "Warning: DDSD_PITCH or DDSD_LINEARSIZE is not set" that you can click OK to. (I've searched for an explanation for what this error message means and never found any answers).
3. Go to Dialogs-->Layers. Delete all mipmap layers.
4. Open the image you'd like to add to wanted poster in Gimp. If it needs cropping do so now. Try to get it as close to a square as possible. For best results have width slightly smaller then height. It would also be a good idea to save your cropped image when you are happy with it just in case.
5. With your cropped image, go to Image-->Scale Image. Make sure the height and width are set to pixels and click on the chain so that it's not connected as you don't want to keep the same ratio. Scale your image to 222X232. Your settings should match the picture below before you select Scale.
6. With your newly resized image go to Edit-->Copy
7. Go back to your wantedposter.dds and go to Edit-->Paste Into. And use the Move Layers and Selections tool (looks like a plus sign with arrows on the tips) to drag your image over the top of the gray fox's image. Once you are happy with the location go to Layer-->Anchor Layer.
8. Now zoom in on on your picture and you'll notice that around the border of your picture you'll need to fill in a few spots black with the pencil tool.
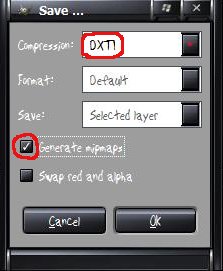
9. When your satisfied with the way it looks go to File-->Save As. You don't need to rename the file for this tutorial, so select Save. On the warning screen that comes up next select Replace. As far as your DDS settings go select DXT1 compression and make sure create mipmaps is checked. Your settings should match the picture below before saving.
Note: You can actually stop here, if you'd like, and the poster that you see when walking around will be your custom made poster. If you'd like to be able to open the poster and see your picture with the info changed then continue further with this tutorial.
For the remaining three files you can use the same method listed above with a few small differences.
-There are no mipmap levels in the vanilla files that need deleting. When saving these three files I find that I must still use the above Gimp save settings and that includes making mipmaps for them to show up in game (I don't understand why this is necessary but for me if I don't mipmap these files they don't show up correctly).
-The size to scale the image you want will be different and are as follows:
textures\menus\books\wantedposter.dds = 483X507
textures\menus50\books\wantedposter.dds = 241X253
textures\menus80\books\wantedposter.dds = 388X405
Once you have all your pictures completed it's time to make the necessary changes to the text on the poster in the Construction Set.
1. Open "Oblivion.esm" in the CS.
2. Go to Items->Book->Clutter->Books-->TG01GrayFoxWantedPoster
3. Right click and TG01GrayFoxWantedPoster and choose edit.
4. In the book text window you can change any of the wording to what you'd like to see displayed. (Make sure not to delete the image tag).
5. When satisfied with the changes go to File-->Save and give your esp a name.
Note: There is a script attached to this poster. From what I can tell it makes it so that the Gray Fox and Hieronymus Lex are now topics that you can talk to people about. I like to leave this alone as I am not aiming to alter gameplay. If you feel this is something that you don't want to happen you can remove it by selecting the "NONE" option (at the top of the list) from the drop down box where you'll currently see "TGReadWantedPoster" I do not recommend going into the script and deleting the information inside.

