Blender/Custom Creature
Introduction[edit | edit source]
To begin I want to say that this process is not for the faint of heart. Creating a creature from scratch probably takes 2-3 times as long as simply rerigging a creature to a vanilla skeleton and retexturing it. However, with that approach you don't have any control over how the creature moves, and it obviously limits creature shape. What if you want a creature with four arms or two heads? Or something that rolls around on the floor? There's simply nothing comparable to total control. And actually making a creature from scratch is very rewarding in my experience. It also brings us one step closer to Bethesda's quality of creatures.
So sit down, read a little at a time, and don't get dissuaded too easily. I've created a creature following this tutorial and included it as an example as well as my .blend files at various points in the process. They are located at: http://www.mediafire.com/?e5hs2azsvtf
Required Tools[edit | edit source]
- Blender: with the .nif plugins
- NifSkope
- An image editing program such as GIMP/Photoshop etc. (for mesh creation)
Creating the mesh[edit | edit source]
I'm not going to describe in depth the process of creating a mesh from scratch. There are already good tutorials on this process. If you need help I'd recommend going to either http://en.wikibooks.org/wiki/Blender_3D:_Noob_to_Pro or Blender/Custom Sword. However, I do have a few tips. First, keep a watch on your poly count. You probably don't want to go over 7-8k verts per creature unless it will be alone in your dungeon. For comparison, a flame atronach is 5.3k verts. Second, please keep in mind that a mesh can only bend during animations on a line between faces. Therefore, you will need some added detail around arm sockets, etc. Also, at least to start I recommend creating your creature out of only one object, not multiple objects, as this will make rigging simpler later.
Another thing to keep in mind is that you must correctly orient your mesh. Here are some pointers. in top view (Num7) you will be looking down on your creature, and ahead will be up on your screen for it. In front view (Num1) you will be looking from behind at your creature and away from you will be forward for your creature. Our creature should also be roughly centered x-0, y-0, with its feet resting on the z-0. If you need something to compare to in size please save BEFORE you import one of beth's meshes, then immediately reload your save from before your import, otherwise you will get multiple armatures (even if you delete the imported one), which can be bad.
Once you are done creating your mesh switch to object mode. SAVE.
Adding the Armature (skeleton)[edit | edit source]
Now it's time to create an armature. An armature is similar to a skeleton for humans in that it controls how the mesh (flesh) moves. To begin we want to make sure that our first bone is in the correct position. Go to front view (Num1) and press shift->c. Now your cursor is at 0/0/0. Press space->add->Armature and lclick. That is your first bone!
Go to edit mode in front view. In the editing panel->armature unpress Envelopes. Oblivion does not support envelope skinning. You can also mess around with the display options. I recommend either octahedron or stick. In the Link and Materials box rename your armature and object to Scene Root. Finally, lclick in the 3d window and press N. Now we are ready to build our armature!
As we add each bone we need to perform specific steps. First we need to name the bone. With our first bone selected, under Armature Bones rename the bone to Bip01. MAKE SURE THAT Bip01 IS THE EXACT NAME! Secondly we need to adjust the bone to fit the mesh. However, since Bip01 is a special bone that controls how far along the x and y axises the mesh moves it needs a special orientation. In side view (Num3) grab the top of the bip01 bone and move it so that the bone extends from the origin straight to the right along the y axis. Hold ctrl so that you know it is exactly on the y axis. Make it end 1-3 units along the y axis.
Now to add our second bone. Our second bone is the Bip01 NonAccum bone, and it is another special bone. It controls the height and position of the mesh without actually controlling movement as the Bip01 bone does. For instance, when you knock a person down they fall backward, but will get up in the same spot as they fell from. The Bip01 NonAccum bone controls the mesh without changing it's position so it will get up in the same spot. Okay. We need the Bip01 NonAccum bone to start in the same place as the Bip01 bone started, so again move the cursor to 0/0/0. To add a bone in edit mode you simply push space->add->bone and the game will add the bone at your cursor. Once you have added the bone switch to side view (Num3) and adjust the end of the bone by grabbing it in edit mode and extending it straight along the y axis. It will occupy the same position as the Bip01 bone, so make sure you make it a little larger so that it is easy to select either bone. (When looking down on your armature from top view, both bones should point straight up along the y axis.) Finally, you need to make your bone a child of the previous bone, in this case Bip01. In the editing panel Armature Bones box with the Bip01 NonAccum bone selected set "child of" to Bip01. This makes it so that when animating when Bip01 moves, Bip01 NonAccum will move as well. However, Bip01 NonAccum doesn't have control over Bip01. ALL BONES must be linked to a previous bone except Bip01, the starting bone.
Note: The Bip01 and Bip01 NonAccum bones are special because they control the location and orientation of your mesh in game. The Bip01 is responsible for locating your mesh along the x and y axis, and controls your creature's location during movement animations. It also controls the orientation of the mesh (the direction your creature is facing) in game. The Bip01 NonAccum is responsible for locating your mesh along the z axis (elevation) and holds the z rotation data for animated rotations. If your Bip01 and Bip01 NonAccum bones are not properly aligned you will end up with incorrect values on export and your mesh will appear strangely rotated and/or sunk in the ground. If your animations suffer from strange elevation and rotation issues, make sure that these bones are both located at the origin (0,0,0) and correctly oriented to point along the positive y axis.
This is a good chance to introduce a useful hotkey. When you need to see inside your mesh just push z to switch to wireframe mode, and z again to go back to solid mode.
Our third bone will be our first "rigging" bone, which is a bone that will control parts of your mesh during animations. Basically, we need one bone for each section of the mesh that moves together. For instance, in a human arm we would need three bones, one from the shoulder to the elbow, one from the elbow to the wrist, and one for the actual hand. Of course, we'd also need many bones for finger animations too.... Just keep the hierarchy of parenting in mind. Our head moves with our neck, which moves with our chest, etc. Start with something close to the Bip01 NonAccum head that controls a large portion of the body. From here you need to flesh out the rest of the bones for your mesh, starting bones near pivot points and extending to the next pivot point on your body.
Also, there's another method of adding bones. Just as you can extrude parts of your mesh with the e key you can extrude from the end of a bone to create a chain of bones. This automatically creates a parenting relationship. So the procedure for each bone is
1. Add bone with base near pivot point
2. Name bone
3. Position end of bone where its controlled verts end
4. Set up parent of bone if not in a chain
So what do you name your bones? Each rigging bone needs to start with Bip01, then you can add something descriptive like "Bip01 Spine" for the creature's spine or "Bip01 TArmL" for the top arm bone on the left side.
Once you are through creating the rigging bones it's time to add the special bones. These bones control things like where a fireball is cast from, where a sword is held, or where a weapon is stowed when unequipped. You don't NEED these bones unless you want your creature to be able to weild a sword/shield/2h weapon/cast spells/fire arrows. Hand to hand needs no special bones. Also, keep in mind that if you limit your creature's attacks you won't have to create nearly as many animations. The simplest would be a spellcasting only creature, followed by a hand to hand creature, then a weapon weilder.
Here are my comments on each special bone. Keep in mind that THESE ARE THE EXACT NAMES FOR THESE SPECIAL BONES. YOU DO NOT NEED BIP01 BEFORE THEM.
1. magicNode: this controls where spell animations start, for instance where a fireball builds up and then is released. A good position would be at the end of a hand rigged to the hand extending out so your animation would make the hand aim toward the player then launch from the hand. Another idea is directly in front or above the creature. The spell is launched from the end of the bone.
2. Weapon: this controls where the weapon is held and its orientation. Weapons are automatically rigged so that the hilt of the sword is slightly in front of the end of the bone, and the blade extends out from there away from the bone. Good position would be in between the hand and fingers extending parallel to the cone of the hand/fingers.
3. Shield: similar to the weapon bone, only in the other hand. Keep in mind the weird orientation of the shield handle. If you attempt to add a shield bone check out how the handle is oriented to the rest of the shield by saving, ctrl x, import a shield and look at orientation of the handle. The handle matches the bone.
4. Torch: similar to weapon/shield.
5. Quiver: Should be on the back facing down.
6. Side/backweapon: only for humans I think.
Now you have the skeleton that will control your animations. Hoorray! Go the Pose Mode and try selecting and moving ONLY the Bip01 bone. Make SURE that all bones move with it. If some don't move you forgot to make them a child of some other bone. In object mode press Ctrl->A and choose "Scale and Rotation to Object data". This will make sure that you didn't accidentally mess something up outside of edit mode. Now select Bip01 and make sure its Roll is 0. MAKE A NEW SAVE
Rigging[edit | edit source]
Start in object mode. First select your mesh, then shift->select your armature. Ctrl->p, make parent to armature->name groups. Now you are ready for the fun stuff. Basically your rigging tells oblivion which vertices to move with which bones, and how much each bone pulls on a vertex that is controlled by more than one bone.
Select the mesh only and go to edit mode. You'll notice in the Links and Materials box that there are now vertex groups for each bone in the body. However, we don't need groups for the "special" bones, so select and delete Bip01, Bip01 NonAccum, and all the others like magicNode, Weapon, etc. leaving only the rigging bones.
Rigging can be accomplished in either of two ways. We can manually select vertices in edit mode, then assign them to a group with a specific weight in the Link and Materials editing panel, or we can can use Weight Paint mode. But first a couple things to keep in mind. Every vertex must be rigged. And regardless of how many bones control a single vertex, that vertex will only have a total weight for movement of 1 unit. So even if at your elbow you assign a vert to the top arm bone and the bottom arm bone with weight 1 each, the vert will effectively be pulled 0.5 by each bone.
A weight of 1 means that if a vert is only moved by one bone then if the bone moves 3 units to the right, the vert will also move exactly three units to the right. So for each bone controlling parts of a mesh, you would assign 1.0 weight to verts in the center of the bone area, then less weight where you want other bones to have more control until you've completely rigged that area. Then move onto another area. You can use pose mode (first select the armature, then select pose mode) to see how well your bones will handle bone movement in animations, just make sure that you undo the changes before moving on.
I know rigging is complicated, so beyond experimenting I've also tracked down a couple tutorials specifically on rigging. Check them out if you need help
http://www.blender3dclub.com/index.php?name=News&file=article&sid=21
http://www.blender3dclub.com/index.php?name=News&file=article&sid=24
Just keep in mind that oblivion doesn't support Envelope skinning. The first covers weight paint, which may be easier for some people.
There's also this tutorial:
http://www.mwmythicmods.com/Archives/CS/Blender%20Skinning%20Rigging%20guide.htm
Which is useful because it is specific to oblivion, but unly covers rigging using the default NPC skeleton, so it isn't appropriate for your creature.
Once you are done try going to pose mode and moving Bip01. Every vert should move. If some don't you missed them during your rigging. Then reset your pose by selecting all bones in pose mode, then doing alt->r. Finally go back to object mode, select the armature and do ctrl->a again, then make a new SAVE, titled something like meshwork.
This is a good time to think about going back and doing something simple like UV mapping your mesh. Your mesh is for the most part ready to export now, but from here it can get frustrating. But first export your .nif choosing Geometry Only and Creature. If for some reason when you open this creature the skeleton has NiTransformControllers for each bone then you will need to delete them, then flatten the skeleton branch and your creature mesh should be ready to go!
Creating the skeleton.nif[edit | edit source]
Open your meshwork file from before if it isn't open and immediately resave it as skeletoncapsules. Do not save over your meshwork file, you will need to use it later.
Now we are going to create the collision shapes for our mesh. However, these probably aren't what you are thinking. These shapes only control how your creature will act when knocked down/unconscious/dead. In other words how its ragdoll physics work. In combat they play no part. Each creature actually has a simple capsule mesh that controls whether or not it gets hit or runs into a wall, etc.
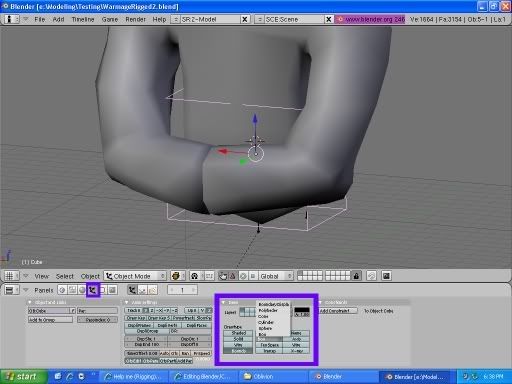
This process may seem convoluted, but you must follow the steps as best as is possible. Basically we are going to recreate the shape of our mesh using simple shapes centered on individual bones. Begin with your armature selected in edit mode, front view. Select the biggest, most centrally rigged bone and do shift->s->Cursor->Selection. Now your cursor is at the Centre of the bone. Go back to object mode. Press space->Add->Mesh->Cube.
In the Panels window select Object View (F7). With the square selected in the draw box change the drawtype to Bounds and in the Draw Extra dropdown box to either Sphere or Cylinder, depending on what fits your mesh shape better. Now go to Logic View (F4). With your new object selected choose Actor->Dynamic->Rigid Body and turn Bounds on.
In object mode or edit mode, Scale the mesh to fit the bone (do not rotate) and apply Scale Data (Ctrl A - if you do this in Object mode, not required if you scale in edit mode). Next rotate the mesh if it is required in Object mode (DO NOT APPLY ROTATION DATA ... if you need to scale after rotating do so only in edit mode and do not rotate in edit mode.)
Here's an example of a first collision shape:
http://i255.photobucket.com/albums/hh130/kilzaja/Capsulesetup.jpg
The next step is to tie this object to the specific bone. To do so, first select your armature and go to pose mode. Now select your object->shift->rclick the bone. If you select the armature you weren't in pose mode at the start. Ctrl->p->Bone to make the collision object the parent of this bone.
You may (and should) also assign the mass to collisio objects within blender. In logic view, change the mass value and also add a new float property named Mass with the value that you want. For a general idea of mass values ... a single human thigh in oblivion has a mass of 45, whereas its first collision object (on Bip01 NonAccum) has a mass of 60. In general masses should decrease from the central object to ends.
Now create an object for each of the bones that make up the major parts of your mesh. You don't need an object for each and every bone (for example fingers) because bones will inherit Physics from other bones, higher or lower in their Heirachy ... remember however that if a bone does not have any Physics data to inherit from then it will keep playing the creature's Idle Animation. Also you don't need an object for special bones like Bip01 or magicNode, because their animations don't matter after creature death ... most bethesda creatures have Bip01 NonAccum as the first bone with a collision object.
Once you have created these objects it's time to link them together. Without links they will act as separate bodies and fall apart. { Depending on how you have segmented and skinned your mesh ... this can lead to two things in game ... for some like the skeleton and Storm Atroanch it will cause limbs to get cut off and fall apart ... for others it will cause ugly vertex distortions.}
If you don't want the collision bodies to fall aprt then you would need to link them together with "constraints". Constraints basically work like Joints, they hold together collision bodies while only allowing limited movement. There are a number of constraints we can put between objects that will limit their movement. The ones Bethesda used for their skeletons are outlined on this page: http://niftools.sourceforge.net/wiki/Oblivion/Oblivion_Bhk_Constraints
Blender can only create two of these constraints, the bhkLimitedHinge Constraint and the bhkRagdoll Constraint. We will use the limited hinge for hingelike joints like a knee or elbow that only rotates on one axis, and the ragdoll constraint for more free joints like neck, hips, shoulders etc.
To create these constraints select the object that is FURTHER DOWN the creature's armature hierarchy. For instance, if we have an upper and lower leg, each with an object, in Object Mode select the object linked to the lower leg. Go to Object View (F7) and in the Constraints box choose Add Constraint->Rigid Body Joint. You can choose either Ball or Hinge. Ball is for the ragdoll constraint and hinge is for the limited hinge constraint. Now in the toObject box type the exact name of the other object this object is linked to. For instance, if this one is named box 5 and the one for the upper let is named box 4 type box 4. Press enter and the red box should go away.
You can position
This is all the detail we can achieve in blender for each joint, so link each object together to recreate the armature hierarchy, starting at the farthest from Bip01 and going inward.
Here's an example of two capsules linked together with a constraint:
http://i255.photobucket.com/albums/hh130/kilzaja/CapsuleConstraint.jpg
Now we need to create one last box, the box controlling hit detection/collision. Add a box as before centered on our mesh and extending around it. Choose Drawtype Bounds but don't make it an actor or change its draw extra. Go to Pose Mode and select it and the Bip01 bone and make parent to bone. Now with this box selected in the Object and Links box rename the object to BSBound. The par should show as Scene Root. SAVE.
Now we are ready to export our armature, so delete the mesh leaving only the armature and the collision objects. Select all objects. When you export the name must be skeleton.nif. Choose "Export Geometry Only", and "Creature", leaving everything else the default. If everything goes as expected we now have our Skeleton! Now to fix it.
Open the skeleton.nif in Nifskope. I don't know why exactly, but when we export this skeleton we end up with double NiTransformControllers. However, this is vastly preferred to having none which is what we got with older nifskripts, and is an easy fix. In nifskope we will have to expand the entire structure of the Scene Root and examine each NiTransformController or BhkBlendController. If there is a NiTransformController inside of any other NiTransformController delete it by rclick->block->remove branch. Do the same for any NiTransformInterpolators you might find. Inside of each bhkBlendController there should be a NiTransformController, which is perfectly fine. Just make sure there isn't a second NiTransformController or NiTransformInterpolator inside of this NiTransformcontroller. If you need something to compare to open a new Nifskope window and open one of beth's creatures.
Once that's done it's time to adjust our constraints. First in the Render menu make sure that everything but Show Hidden is checked. In the render window we should now be able to see our collision objects as spheres or capsules. Inside of each capsule we can see our constraint as either a cone or a little circle. Cones are ragdoll constraints and circles are limited hinge constraints. The first thing to do is to adjust the pivot point of each a constraint to the bone joint. To do so select a constraint (click it), then in the Block Details window expand the Ragdoll or Limited Hinge block.
For a Ragdoll Constraint I recommend setting Pivot A to 0/0/0, Plane A to 1/0/0, and Twist A to 0/1/0. This is a simple setup that will limit bone's rotation to about 115 degrees in any direction perpendicular to the bone's current orientation. Now right click Pivot B and choose A->B. Confused yet? Hope you remember (or at least heard of) radians from high school. Basically instead of degrees of rotation .nifs use radians. So instead of 360 degrees there are 3.1415926535 (ie. pi) radians of rotation possible. DO NOT enter a number above 3 (excluding friction and pivots) or it's likely nifskope will crash. If you don't want your joint to feature 230 degrees of rotation then you need to lower the last five entries above Max Friction. To keep it simple I recommend just entering equal values like .4 or .2 for each and looking at how it effects the constraint. Or you could take a look at this page and try to figure it out: http://niftools.sourceforge.net/wiki/Oblivion/Oblivion_Bhk_Constraints
For Limited Hinge Constraints you can again move the pivot easily, but to be honest I haven't had much experience using them beyond that. I recommend you check that page linked above out or maybe copy a bethesda nif's values.
The last thing that we may have to fix is the BSBound Box. If it isn't immediately under the scene root then you need to move it up to the scene root. Heh. WHEH! Save that sucker and get ready for animations! http://i255.photobucket.com/albums/hh130/kilzaja/BSBound.jpg
Creating Animations[edit | edit source]
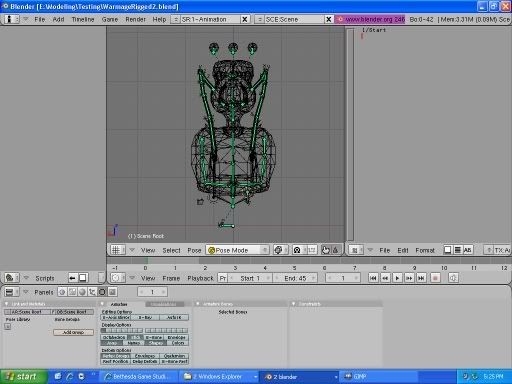
Back in Blender load your meshwork file and save it as animationready or something like that. Just don't save over meshwork. Select your armature and go to pose mode. Now push ctrl->LEFT. This is the ideal view for animations I've found. Set End to 46. It will vary by animation but 45 is a good base I've found. Now with your mouse in the 3d view area press a to select all bones (and go to wireframe with z). press i->locrot. Change the top right window to text editor. Create a new text file titled "Anim". In the Anim text buffer type "1/Start". This is the best setup we can make for animations so resave as animation ready.
Making animations is simple. First choose a frame in the box to the right of the End box, then set up a pose by grabbing or rotating bones, select all bones, and finally do i->locrot again. Each time you do i->locrot you are adding a keyframe to the animation. You don't need a keyframe for each frame in the animation, but you need one at the start and end frames and the pose should look the same even if the armature itself has moved. Otherwise it's possible you will have your creature skipping from one pose to another between animations. The game engine can blend between individual keyframes in animations. http://i255.photobucket.com/albums/hh130/kilzaja/animationready.jpg
You will need at a minimum a forward, fastforward, backward, idle, turn left, and turn right animation. If you want your creature to be able to attack you'll need more, cast spells more, etc.
Note: Remember, for movement animations, your Bip01 bone controls the position of your mesh along the x and y axis, and z rotations are exported on the Bip01 NonAccum bone. To turn your creature so that it is facing a new direction, change both the Bip01 and Bip01 NonAccum bones. If you only rotate one bone, you will end up with the character moving in a direction different from the direction they are facing.
One thing to note is that to delete a keyframe if you make a mistake you should go to the NLA editor, choose the keyframe (only that keyframe), and press x. So how many frames should an animation be/how much forward should you move in a forward animation? You'll have to check out beth's animations to get an idea. http://i255.photobucket.com/albums/hh130/kilzaja/NLAeditor.jpg
Once you have a decent looking animation you need to do two more things. First is to give the game specific cues using the text buffer. For instance, in cast and attack animations the game needs to know when to launch a fireball or to check if the swing hits a creature. In both cases you just add an entry like 25/Hit to tell the game when to launch/check. There are some other things you can add to the text buffer such as the Enum and Blend commands (see beth animations for exact syntax. To look at a beth animation you would import skeleton.nif with skeleton only + parent selected depressed, and import animation/choose an animation. Not all animations can be imported successfully). Enum tells the game when to play a sound. Blend is actually very useful because it controls how the animation loops. You don't want a creature at rest in a forward animation to return to that position at the beginning of each loop. I'll try to expand this section with details later. Also, don't forget the End command at the end frame like 45/End!
To play your animation in Blender choose the start frame, then do Alt->a.
The second thing you need to do is to put in bone priorities. Select all bones. In the Top left window (which should be a scripts window) choose scripts->object->set bone priority. Priorities determine which animations play on which body parts when multiple animations are playing at once. For instance, if a creature is running forward and casting a spell the legs should run forward while the top of the body should cast the spell. In Oblivion's system, the highest priority wins. If you want to copy beth's model here's a basic structure:
 20: idle animations all bones
 30: movement animations
   ->30 for Bip01/major parts of the body, special bones
   ->70 for hands and fingers holding a weapon in onehandforward.kf, etc.
 34: recoil all bones
 45: casting animations
   ->26 for Bip01/movement bones like legs
   ->46 for arms/torso doing casting animation/most special bones
   ->66 magicNode
 55: physical attacks
   ->25 for Bip01/movement bones like legs
   ->55 for arms/torso doing swing/special bones
 70: stagger all bones
For more detail please refer to Beth's third person character animations located in the .bsas under meshes/characters/_male/. You can easily check a bone priority by opening the animation in Nifskope, choosing the NiControllerSequence block, then in block details expand and examine the controlled blocks priority? value.
Now that you hopefully have a completed animation resave this file as forwardanimation or whatever's appropriate. Just don't save over your animationready file. Now export your animation. The name has to match beth's animation names, such as forward.kf, handtohandattackleft.kf, etc. For the most part these animations are ready to go in game. However, in looping animations, which are the movement animations and the idle animations, you will have to make one small tweak. Open the animation in nifskope, and choose the very top block, the NiControllerSequence. In the Block details change cycle type from CYCLE_CLAMP to CYCLE_LOOP. That's it!
To test your animation you can load your skeleton.nif and do Spells->Animation->Attach .kf. Just don't save over your skeleton.nif.
Now go back and create the other animations. Once you have them it's time to move on to setting up your creature in the CS. But first set up the folder structure for your creature in the Oblivion/Data directory. Your mesh, skeleton, and animations go in the Data/Creatures/Yourfolder and the textures go in textures/creatures/yourfolder. Make sure the NiTexturingProperty's path is correct!
CS work[edit | edit source]
This subject has already been covered in adequate detail in the Custom Creature Creation tutorial in the CS Wiki located here:
Please refer to its CS Work: make a quickie mod section for the exact procedure. But I've also abridged the steps just to make sure this tutorial is somewhat complete.
Also, here are a couple useful links for AI and Combat Styles:
Your perilous journey is almost at an end! Open the CS without any mods loaded and create a new creature. Add your skeleton.nif. Press OK and Save your mod. Now reopen the creature and go to modellist. Choose your model (and pray). Click full preview (and pray). Test out your animations (and pray). Now just give him some simple AI and a combat style, maybe a few spells and some equipment and you're all set!